• Facebook
  • Google+
  • Instagram
  • Pinterest
  • Twitter

Bakers Royale

  • Sweet
  • Savory
  • All Recipes
  • About
    • Press
  • Contact

Tips and Tricks: The easiest way to cut even cake layers

March 24, 2012 By Naomi Robinson | Bakers Royale 35 Comments

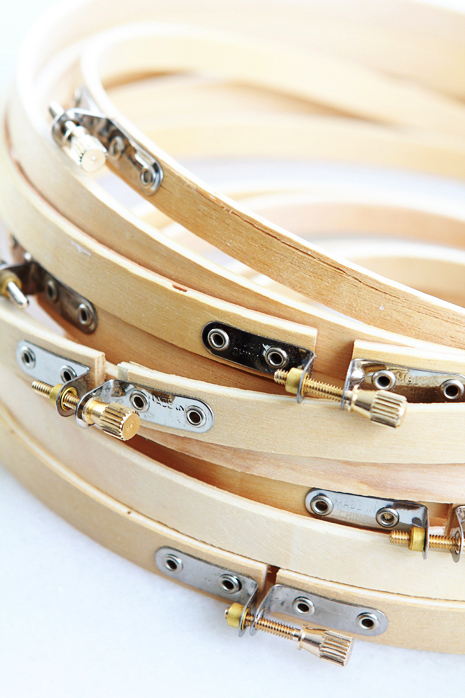
What are those and what are they doing in my kitchen? Those are cross stitch hoops and the idea of using them for cakes came to me as I was working on a cross stitch project. Are you seeing it yet?

Okay, here’s the thing. If you know me or your regular reader, than you know I like to inhale cake like people inhale air. But if you take a look around the blog, I don’t actually do too many full size layered cakes. You’ll find lots of mini, bundts and various other cakes, but not the beautiful layered cakes you will find here, here, here, here and here.

There is a reason for that. Plain and simple: I’m not very skilled at it. I can never seem to cut nice even layers. No matter how hard I try the layers end up cockeyed or sideaways. I’ve even tried this tool, but the problem with it is either the cake moves around too much or you have to push down on the cake to hold it steady. Well holding your cake down pretty much squishes it flat.

But aside from cutting even cake layers, there is also the matter of actually being able to frost beautifully—not my forte. Luckily, I’m pretty stubborn, so for now I’ve solved my first problem to cutting even cake layers. As for the frosting, I’m still working on that one.

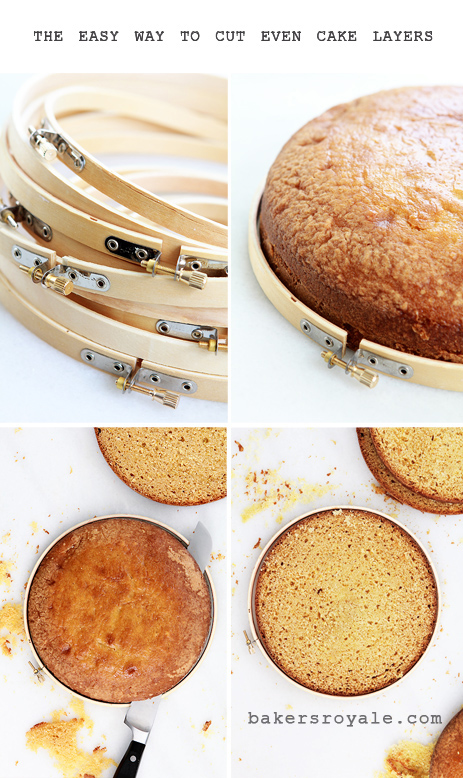
Check out this quick and dirty trick I came up with to cutting even cake layers. Seriously, can it get any easier? The best part, those cross stitch hoops are about $1.60 a piece and come in sizes from 3-12 inches. Want thicker slices – just stack two loops one on top of another and tape them together.

Directions:
1. Place hoop around cake. I use the outer ring of the hoop, so that I can hold onto the the adjustment knob if needed.
2. Rest serrated knife directly on the top edge of the hoop and cut across the cake. Use the top edge of the hoop as the guide to keeping your knife level. Also, be sure to keep the tip of the knife fully visible on the opposite side to prevent the knife from angling down.

And there you have it – a fast and easy way to cut even cake layers.

If you haven’t guessed, cake post coming tomorrow. So come back and see what will become of those cake layers.
Filed Under: Cakes, Sweet, Tips & Tricks

« Banana Pops
Do-Si-Dos Pie »

Comments

  1. Averie @ Averie Cooks says

    March 25, 2012 at 4:36 am

    Good tips and if you have any tips on how to cut super precise lines into a 9 x 13 pan of bars, I’m all ears. My lines are never quite perfectly straight. I wish I had a huge knife that could just slice a 13 inch row in one fell swoop but I don’t. lol

  2. Becca says

    March 25, 2012 at 4:48 am

    You are a genius! Fabulous trick.

  3. Monica says

    March 25, 2012 at 11:47 am

    This is brilliant! I have a expensive tool that did not work… specially if I made a cake that is smaller than 9 inches..

    I running to my nearest Michael’s to stock up on these.. I may even make a cake today to try it out…

    Oh boy.. exciteddddd

  4. Kyla says

    March 25, 2012 at 12:38 pm

    Avery…depending on the pan of bars you can use fishing wire to cut straight lines for your bars. I don’t have any luck when they are a”harder” bar but for brownies and so on it is slick as ever and this way you get clean cuts also so no rough edges!!!!

  5. Shannon says

    March 25, 2012 at 12:43 pm

    This is perfect. I cut so many cakes at work, and even with a few weeks of practice I am not doing so well.
    Icing is getting a lot easier. We freeze the cakes for an hour before we frost them, which helps keep the crumbs down to a minimum.

  6. Heather says

    March 25, 2012 at 1:30 pm

    That’s a cool trick. If you want a great YouTube tutorial for perfectly iced layered cakes check out Edna’s video at: http://www.youtube.com/watch?v=dIXHFqpJK84
    She has been a teacher and baker for many years and has recently been a competitor and judge for the food network.

  7. Naomi says

    March 25, 2012 at 2:16 pm

    Monica – I have bought a few tools too. They were pricey and none of them worked too well. I love this cheap and easy trick.

  8. Russell says

    March 25, 2012 at 9:54 pm

    I use an Agbay http://www.agbayproducts.com/ to level and slice my cakes, but i’m going to try these out for a level layer of icing between the cake layers, the problem i have is i tend to create a little bit of a dome shape and it only gets worse as each layer of cake gets added on. I have a trowel that i got at the hardware store that i scrape on top of the cake to make sure it’s even. this will make it easier.

    As for long straight cuts, I use a ruler or yard stick and cut along it with the knife.

  9. Backflittchen says

    March 25, 2012 at 2:56 pm

    This is such a great idea!! Thank you very much for the trick because I’m not very good in cutting nice even layers, too =D

  10. Regan Martin says

    March 26, 2012 at 12:17 am

    Genius! Thanks a bunch…..I am SO gonna use this!

  11. Naomi says

    March 26, 2012 at 1:58 am

    Russell-You just revealed my next Tips and Tricks post for icing even layers. 🙂 The hoops work beautifully for that as well.

  12. Sylvie @ Gourmande in the Kitchen says

    March 26, 2012 at 3:13 am

    That is genius! Very clever.

  13. Ivy Motuyang says

    March 26, 2012 at 3:20 am

    you are brilliant! why didn’t i think of that.

  14. Kaitlin says

    March 26, 2012 at 5:13 am

    This is super smart! Thanks for the shout out 🙂

  15. Kulsum at JourneyKitchen says

    March 26, 2012 at 9:26 am

    you are genius. Genius!

  16. La Quinta says

    March 26, 2012 at 10:41 am

    Can wait to try this

  17. Rachel @ Baked by Rachel says

    March 26, 2012 at 1:39 pm

    Nice trick!!

  18. Amanda says

    March 26, 2012 at 1:49 pm

    Fun trick Naomi!

  19. Carlos says

    March 26, 2012 at 4:45 pm

    That is an ahhhhhhhhhh moment!

    Great tip!

  20. Chau says

    March 26, 2012 at 11:53 pm

    Awsome trick. I rarely tackle layered cake. If I ever will I definitely use this trick. Thanks

  21. Alia says

    March 27, 2012 at 12:36 pm

    Genius!!! I always make layered cakes and always DREAD halving them.. This trick might just save me loads of time.. Looovveeee!

  22. Barbara says

    March 28, 2012 at 3:49 pm

    For an addition to this trick, try using a piece of dental floss instead of cutting with a knife. Works great and gives you a nice even cut.

  23. Cheri says

    March 28, 2012 at 9:43 pm

    Great trick – very clever thinking. Love the blog.

  24. Roxana GreenGirl { A little bit of everything} says

    March 29, 2012 at 12:33 am

    great idea Naomi! Where did you buy those rings from?

  25. Leigh says

    March 29, 2012 at 6:19 pm

    WOW! I’m speechless! this is so awesome, I’ve been wanting to make a rainbow layer cake but haven’t cause my straight-cutting-skills suck! lol THANK-YOU

  26. Naomi says

    March 30, 2012 at 4:08 am

    Hi Roxanna-I got the hoops from Michaels, the craft store.

  27. TidyMom says

    April 3, 2012 at 11:34 am

    you are SO smart Naomi! What a GREAT idea!

  28. Love Is In the Details says

    April 3, 2012 at 5:17 pm

    Oh my word, talk about a light bulb moment!! I have struggled with the decision to purchase one of those pricy layering tools for a long time and I am now so happy I did not!! I love layer cakes, think they are a lost art and the more layers the better! I am so, so excited to snag some of these and get started, yay, yay, yay, thank you for sharing this brilliant idea!!! Andrea

  29. movcharov says

    April 12, 2013 at 7:21 am

    THANKS, Naomi!!! This is wonderful. I have been using thread, similarly to the ‘dental floss’ comment – you wrap it around the cake, then make an X on the front, and tight it, until cleanly cut – but I have always been afraid that I could not see well the front and the back, at the same time, and honestly – sometimes my layers are too thick, because I have left them that way out of fear that I might break them, when putting the cake together. 🙂 Now, at least, I can be sure that they are ABSOLUTELY evenly cut. (Note to self: buy also a longer bread knife!) THANK YOU! 🙂

  30. Sandra says

    April 30, 2013 at 5:22 pm

    Absolutely brilliant!!

  31. Chromatophobic says

    April 30, 2013 at 8:33 pm

    Cool trick! Another way would be to roll up a strip of card that’s cut the the right size, but the hoops are more reusable.

  32. Josh says

    July 22, 2013 at 11:27 am

    Hi, i read your blog occasionally and i own a similar one and i was just curious
    if you get a lot of spam comments? If so how do you prevent it, any plugin or
    anything you can advise? I get so much lately it’s driving me crazy so any help is very much appreciated.

  33. Destiny says

    July 25, 2013 at 5:03 pm

    Why not cut a pattern like you would with sewing? I can’t cut a straight line, but a rectangle cut from a cereal box would make a nice straight edge. Or you could find a small ruler?

  34. Sandra says

    October 31, 2014 at 8:07 pm

    I use fishing line to slice the cake while it is still in the pan. I am looking forward to using this method.

  35. Ronak Meheta says

    July 19, 2022 at 5:52 am

    Genius! Thank you very much….. I am SO going to use this in one of my own cake bakeries.

Leave a Reply Cancel reply

Your email address will not be published. Required fields are marked *

About Naomi Robinson

Welcome to my cozy corner where baking meets random thoughts and musings. I’m a self-taught baker sharing all things sweet (and some savory—okay, and cocktails) with a whisk in one hand and a camera in the other.

More about Naomi »


Recent Posts

Frosted Guinness Cookie Bar

Homemade Churros with Chocolate Guinness Dipping Sauce

Chocolate Cream Guinness Pie with Toasted Meringue

Coffee Crunch Cupcakes via Bakers Royale

Coffee Crunch Cupcakes

Baker's Royale Cookbook

Categories

Bakers Royale on Instagram

Cheetos Flamin’ Hot Crunchy Fried Mac and Cheese Cheetos Flamin’ Hot Crunchy Fried Mac and Cheese Balls ~ Next level game day food!! Am I right?
-
#tailgate #gameday #macandcheese #foodbeast #cheesey
Shrimp and Corn Chowder ~ When things go crazy we Shrimp and Corn Chowder ~ When things go crazy we go simple! Who else feels this? #ad Back to school has been off to a rocky start with mixed up carpool rides to missed days from being sick. Thankfully soups like this come together quickly and easily. All you need are just a handful of fresh ingredients and some pantry staples like @enjoyrealcoco Coconut Milk and @kettleandfire Bone Broth. Both of which are @TetraPakUSA  packaged. This means I can stock my pantry and not worry about rotating the food month-to-month. The aseptic packaging solution helps unopened food have a shelf life of six months or more without the need for refrigeration or preservatives. I’m telling you it’s the little things, like food packaging—something you don’t even think about most days, that ends up being the thing that can have the biggest impact sometimes! #ProtectsWhatsGood
-
#weeknightdinner #comfortfood  #soupseason #soup #dinnerideas
Who’s ready to roll into fall with cozy, autumna Who’s ready to roll into fall with cozy, autumnal picnics? To kickstart the season, the kids and I are headed to the park to enjoy an Apple Spiced Cake and warm sips of Apple Cider sweetened with our favorite pantry staple, @truvia. #ad

Truvia Sweet Complete Sweeteners are zero-calorie and made with plant-based stevia sweetness. Whether you are using the All-Purpose, Brown, or Confectioners Sweetener, they measure cup-for-cup like sugar in your favorite seasonal baked goods! 

Apple Spiced Cake 
Serves 12 

3 cups (14 oz.) self-rising flour
1 ½ teaspoon baking powder
1 teaspoon baking soda
4 teaspoon ground cinnamon
2 teaspoon ground ginger
1 teaspoon fresh grated nutmeg
1/4 teaspoon ground cloves 
3 eggs
1 cup (6.25 oz.) Truvia Sweet Complete Granulated All-Purpose Sweetener 
1 cup (5.75 oz.) Truvia Sweet Complete Brown Sweetener 
1/2 cup buttermilk
1 tablespoon vanilla extract
3/4 cup vegetable oil 
1 1/2 cups (5.5 oz.) peeled and shredded granny smith apple, about 2 large

Heat oven to 350 degrees F. Lightly coat a 10-12 cup bundt pan with non-stick spray. Set aside. 

In a large bowl, whisk together the flour, baking powder, baking soda, cinnamon, ginger, nutmeg and cloves. Set aside.

In a second large bowl, add the eggs, and beat until combined. Add both the Truvia Sweet Complete Granulated All-Purpose and Brown Sweeteners, whisk until fully incorporated. Pour in buttermilk, vanilla extract, and vegetable oil, whisk until combined. 

Fold dry ingredients into the wet until smooth. Add the grated apples and fold until just combined. 

Pour batter in prepared pan and bake for 45 minutes or until a cake tester comes out free of wet batter. Transfer cake to a wire rack and let cool in the bundt pan for 20 minutes. Unmold cake and let cool completely on a wire rack. Before serving, dust with Truvia Sweet Complete Confectioners Sweetener. Enjoy outside with a seasonal beverage!
Easy Chicken Tortilla Soup because fall means swea Easy Chicken Tortilla Soup because fall means sweater weather, cozy soups like this. Who else is ready for this?!
-
Recipe in bio link or Google Easy Chicken Tortilla Soup Bakers Royale
-
#cozy #comfortfood #chickenrecipes #soup #easyrecipes #weeknightmeals #instayum
Coconut Oatmeal Chocolate Bars ~ Holiday condition Coconut Oatmeal Chocolate Bars ~ Holiday conditioning with this one. I’m so ready to eat my weight in holiday sweets.
-
Recipe in in profile link or Google Bakers Royale Coconut Oatmeal Chocolate Bars
-
#baking #bakingwithlove #bakedfromscratch #bakersgonnabake #oats #instayum #instabake
Double Decker Ooey Gooey Bars - Come and get it! W Double Decker Ooey Gooey Bars - Come and get it! We all need the extra fat for winter. Who’s in?
-
#baking #bakersgonnabake #sweettreats #madefromscratch #dessert #brownies #ooeygooey

Copyright © 2023 Bakers Royale

Terms of Use · Privacy Policy · Contact