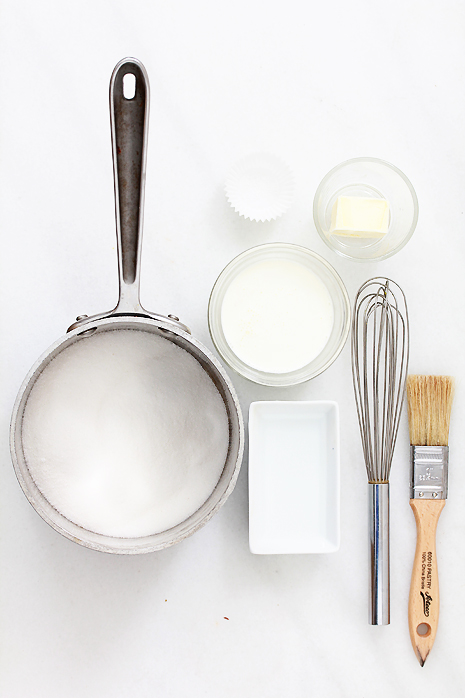
I’m getting down to basics today with a very detailed step-by-step picture to making homemade caramel sauce. For this baking basic, I will be going through the wet process vs. dry process for making caramel sauce. The wet process utilizes water to dissolve the sugar (stay tuned for the dry method tutorial). I’ve done this tutorial before in a previous post but not as detailed.
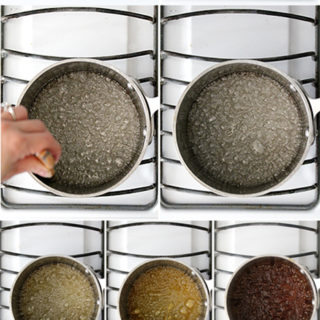
Today, I’m breaking it out on its own with a color chart for the different stages of caramelizing since many of you have had a few questions regarding certain steps-specifically, “What is dark amber”.
How to Make Caramel Sauce
For this caramel sauce tutorial, I will go through the different color stages including the dark amber that you so often see me directing you towards in my dessert recipes. You will often hear me refer to it as a ‘burnt caramel flavor’. I should mention it’s not truly burnt, since burnt caramel is disgusting and not usable. But it’s a term adopted because it’s the smoky point during the dark amber stage.
I like my caramel taken just beyond that smoky point by about 30 seconds before I add my heavy cream and butter. This is when the sugar caramelizes to the point of actually imparting a deep flavor rather than just being sweet.
I don’t have temperatures listed, as the caramelizing process moves too fast to grab an accurate reading. I also don’t have times listed once the coloring starts since there are too many variables such as different types of stove ranges, types of pots used, size of pots – all these things will change the time. When you’re working with caramel things move real fast once the first shade of amber appears.
Trust me when I say you will learn to use your nose and eyes to gauge the readiness of when and how you like your homemade caramel sauce. Don’t worry if you mess it up the first, second or third time-I’m sure most of us did.
Luckily, sugar is cheap and it’s like riding bike once you nail it, you won’t forget it.

Step-by-Step Tutorial to Making Homemade Caramel Sauce with Caramel Color Chart for Light to Medium to Dark Amber Caramelizing
The Best, Creamiest Caramel Sauce
Ingredients
Instructions
Notes
This is something everyone should know! Lovely recipe!
So is this sauce like the thickness of the caramel you dip an apple slice into or is it thinner?
Carol-Cooled it will like the thickness of caramel for dipping apples-just mixed it will be thin.
Can you use brown sugar to make caramel? I am curious. I followed someone’s recipe for caramel that used brown sugar and it did not melt properly.
Looks great and thank for the info. Whenever I make caramel sauce no matter what I do, it always tends to taste..burned. I am sooo careful too b/c I know my tendencies. But still…never just perfect. Thanks for your post.
this is SO useful! One time I went too far, and ended up having to scrape a ton of burnt sugar off the bottom of a pot, and since then have always been afraid of making caramel. When i have to, I noticed from this post that I now am too cautious with the caramel and stop at the medium-amber stage. This is the perfect tutorial–SO HELPFUL!–and I am so thankful to you for writing it up!
Thank you for this tutorial. I’m one of those so afraid to make caramel. This will truly help me to try it. Does this caramel solidify after sitting in room temperature overnight? I’m planning to put it as the base layer for my pie, will it work?
Great tutorial Naomi! I love the last picture showing the different color phases 🙂
Thank you for sharing your love of food and knowledge with us! A picture IS worth a thousand words when it comes to things like this. I truly appreciate all you do to help the rest of us. Happy Festivus!!!
This is so helpful! I’ve had some success with caramel (only a few tries) but will definitely be bookmarking this extremely welcome and well-documented guide for future use!! Thanks so very much!
I like caramel better than chocolate, and got comfortable with making it years ago. Your tutorial and illustrations are excellent. Ela, as a sauce,this recipe is designed to remain a liquid, so there should be no problem leaving it overnight.
I love the dark amber caramel. Thanks for the tutorial.
Happy Holidays Naomi!
The first time I made home made caramel, I used your recipe (it was for the Toffee Crunch cupcakes). It worked perfect. Last week I bought a candy thermometer, and this comes so incredibly handy. I used to work with nose and eyes only but this, this is so much easier in my opinion.
Fantastic tutorial Naomi. Caramel is such a wonderful addition to anyones repertoire. I love your detailed photos.
Happy holidays to you and your family.
Anna-You can use brown sugar, but if you do so it turns to butterscotch sauce – stay tuned, as I have a how-to on this exact thing.
The more pictures the better! I’m excited about seeing what you have to come in the new year! You’re amazing!
I’ve tried a lot of online caramel recipes and this is my absolute favorite. I thought that I had lost it a long time ago, but I just re-found it and it made my day. My favorite way to make this is to add a good dash of sea salt and some chipotle chili powder at the very end.
Thanks Naomi, this recipe is fabulous, my caramel sauce turned out beautifully.
WHY IS THE CARMEL NOT PRINTER FRINDLY
I followed this tutorial and it turned out great! It was really easy too. I think the next time I make it I would put just a little more cream in it when it is warm because it ended up really stiff after it cooled completely. But it was very delicious.
perfect!…good tutorial..love it..thank u so much
Thanks for the specifics as noted in step 3. Not stirring after the water and sugar dissolved made all the difference!
Excellent caramel recipe! The only thing I would say is that make sure that you’re either a) using a long whisk or b) wearing some heat protection on your whisking hand when you pour in the butter and cream because otherwise you might be in for a wicked steam burn (which is basically what just happened to me 🙁 )
Is there a substitute for the heavy cream to make it non-dairy or vegan?
Hi Naomi, just came upon your site, I used the search but couldn’t find the butterscotch recipe, can you direct me to it? Great stuff.
Ooops, meant to reply here for the butterscotch sauce.
If I want to make a “spiced” caramel, would cinnamon be okay to add? Or would it be drowned out by the other flavors? I’d love to add a spice blend to give it sort of a fall flavor but I am not sure when or how to add them. Does anyone have any suggestions or resources? Thanks so much!
I believe you can use coconut cream. If you chill coconut milk overnight (or for at least 4-5 hours) and then scrape the thicker cream out of the can and save the thinner stuff for another baking project, you can use that cream in place of heavy dairy cream. You have to do the separation otherwise it won’t have the same fat content of heavy cream. It’s worth a try! 🙂
Thank you, Thank you for your remedies for too hard of a sauce. I had tried the caramel portion twice for a recipe for Goo-Goo Pie Parfaits with the same result. I needed an alternate option and your remedy saved the day and resurrected my dessert! 🙂
Has anyone been paying any attention? In the directions you fail to mention when to add the lemon juice, butter and salt. I’ve read enough caramel recipes to know when these are added, but for others it would be a mystery.
When do I add the butter, salt, and lemon juice? Is the butter hard, softened or melted?
Looks incredibly yummy . . . the smoky flavor sounds fantastic. Like L, I noticed you didn’t mention when to put in the butter and lemon juice. Unlike L, I am unfamiliar with when to put them in based on other recipes! Would you let me know if you modify this recipe to include this step? Thanks!
When should the lemon juice, salt and butter be added?