• Facebook
  • Google+
  • Instagram
  • Pinterest
  • Twitter

Bakers Royale

  • Sweet
  • Savory
  • All Recipes
  • About
    • Press
  • Contact

Basic Baking Series: Tuiles

August 8, 2010 By Naomi Robinson | Bakers Royale 9 Comments

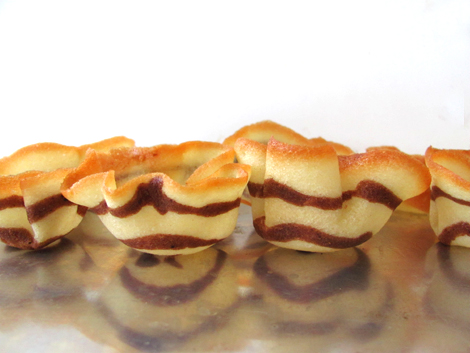
Tuile Cups~ Thin and crisp, these are basic cookies that can be enjoyed on their own or can easily be molded into serving vessels or formed into fun shapes for garnishment.

Tuiles

Tuile Cups

The name ‘tuile’ is a French word meaning ’tile’.  Made in its traditional form, the circular shaped cookies are placed over a round object like a rolling pin when they come out of the oven. Once shaped as such and lined up next to one another, they resemble a tiled roof top, hence the name.

Of course there are as many basic recipes as there are ways to flavor this cookie by adding some nuts, extracts and flavorings. I generally keep my mine simple as I like my tuile to accent my main dessert.

These tuile cups will be back in the coming days as a serving piece for another recipe.

Stay tuned.. . .

A few notes:

  • The batter will be slightly thick and sticky.
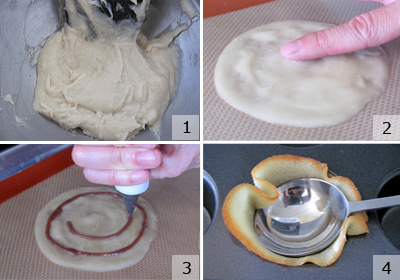
  • Work quickly if you are shaping these into cups. To shape tuiles into cups, quickly push each one into a muffin pan hole with the back of a tablespoon.
  • Don’t bake more than four and five cookies at a time, as they quickly become crisp when cooled. If they do become too cool to shape, return them to the oven for a minute or two to soften them to pliable consistency.
  • Tuile templates can be purchased on Amazon or you can easily make your own by tracing your desired design and using a Xacto knife to cut it out of cardboard.
  • You can leave your tuiles plain or dress them up a bit like the picture by mixing in some cocoa powder or even a little food coloring.
  • These spread and bake best on silpats. If you don’t have any, make sure to grease the parchment paper well.

Basic Tuile

Makes 12 4inch cookies

Tuiles Step-by-step

Tuiles Step-by-Step

Preheat oven to 350 degrees F.

Ingredients:
1/3 cup flour
1/2 cup plus 2 Tbsp. granulated sugar
1 tspn vanilla powder
1 pinch salt
3 egg whites from large eggs, slightly whisked
2 1/2 Tbsp. melted unsalted butter
3 Tbsp. melted butter to grease the parchment paper
2 Tbsp. milk
Instructions:
1.Sift the flour, sugar, and salt into a small mixing bowl. Add the egg whites and then the melted unsalted butter, and whisk until just combined. Set the batter aside to rest for 30 minutes before using, or cover and refrigerate for up to 3 days.
2.Using 1 1/2 Tbsps. per tuile, spoon the batter onto the baking sheets, 5 per sheet. Keep cookies 2 inches apart, to allow for spreading. Dip a finger in the milk and spread cookie batter into a 3-inch round. To ensure even baking, make the edges no thinner than the centers.
3.Bake the tuiles 8 to 10 minutes, or until the edges are golden and the centers are just beginning to color. Remove from oven and shape to desired form.

Adapted from Epicurious
Filed Under: Baking Basics Series, Sweet

« Oreo Cookie Ice Cream Sandwiches on a Stick
Homemade Strawberry Ice Cream »

Comments

  1. ingrid says

    August 9, 2010 at 7:42 pm

    Very cool! Can’t wait to see what you fill them with. Hopefully not something chocolaty, LOL. Caramel-y instead? 🙂
    ~ingrid

  2. Michelle says

    August 9, 2010 at 9:45 pm

    Oh, these make a perfect little serving bowl. What wonderful creation are you planning? Can’t wait to find out…

  3. Deanna says

    August 10, 2010 at 12:03 am

    I’ve always wanted to make like a mousse-like desert, and put one of these on top like a dome, so you have to bust it open to get to the delicious goo within. And if I was feeling really fancy, I would make the goo within look like an egg yolk (white chocolate mousse?? yum yum) (because weird stuff like that excites me)

  4. Kim at Rustic Garden Bistro says

    August 10, 2010 at 5:16 am

    Ooh… me likey! Can’t wait to see part two of this!

    [K]

  5. Eliana says

    August 10, 2010 at 11:59 pm

    These look so elegant and delicious. I’d love to give them with a chocolate and walnut mixture. YUM.

  6. Urvashee says

    August 11, 2010 at 12:19 pm

    These look great. I love the way tuiles taste and they are my favorite decorative garnish choice. I’ve never thought to use a chocolate mix to dress them up though. I’ll have to keep that in mind for next time! Can’t wait to see what you do with them.

  7. Lisa says

    August 12, 2010 at 12:16 am

    Beautiful. Never thought to shape them into cups! Brilliant as always.

  8. Kirbie says

    August 12, 2010 at 5:25 pm

    How neat! I must try this out.

  9. Mary A says

    August 14, 2010 at 4:50 pm

    What is that you’re pipeing on the tuiles. It’s not mentioned in the directions or ingredient list.

Leave a Reply Cancel reply

Your email address will not be published. Required fields are marked *

About Naomi Robinson

Welcome to my cozy corner where baking meets random thoughts and musings. I’m a self-taught baker sharing all things sweet (and some savory—okay, and cocktails) with a whisk in one hand and a camera in the other.

More about Naomi »


Recent Posts

Coffee Crunch Cupcakes via Bakers Royale

Coffee Crunch Cupcakes

Apple Cake with Guinness Caramel Sauce

Chewy Coffee and Chocolate Chunk Blondies

Parker House Rolls

Everything Bagel Parker House Rolls

Baker's Royale Cookbook

Categories

Bakers Royale on Instagram

Cheetos Flamin’ Hot Crunchy Fried Mac and Cheese Cheetos Flamin’ Hot Crunchy Fried Mac and Cheese Balls ~ Next level game day food!! Am I right?
-
#tailgate #gameday #macandcheese #foodbeast #cheesey
Shrimp and Corn Chowder ~ When things go crazy we Shrimp and Corn Chowder ~ When things go crazy we go simple! Who else feels this? #ad Back to school has been off to a rocky start with mixed up carpool rides to missed days from being sick. Thankfully soups like this come together quickly and easily. All you need are just a handful of fresh ingredients and some pantry staples like @enjoyrealcoco Coconut Milk and @kettleandfire Bone Broth. Both of which are @TetraPakUSA  packaged. This means I can stock my pantry and not worry about rotating the food month-to-month. The aseptic packaging solution helps unopened food have a shelf life of six months or more without the need for refrigeration or preservatives. I’m telling you it’s the little things, like food packaging—something you don’t even think about most days, that ends up being the thing that can have the biggest impact sometimes! #ProtectsWhatsGood
-
#weeknightdinner #comfortfood  #soupseason #soup #dinnerideas
Who’s ready to roll into fall with cozy, autumna Who’s ready to roll into fall with cozy, autumnal picnics? To kickstart the season, the kids and I are headed to the park to enjoy an Apple Spiced Cake and warm sips of Apple Cider sweetened with our favorite pantry staple, @truvia. #ad

Truvia Sweet Complete Sweeteners are zero-calorie and made with plant-based stevia sweetness. Whether you are using the All-Purpose, Brown, or Confectioners Sweetener, they measure cup-for-cup like sugar in your favorite seasonal baked goods! 

Apple Spiced Cake 
Serves 12 

3 cups (14 oz.) self-rising flour
1 ½ teaspoon baking powder
1 teaspoon baking soda
4 teaspoon ground cinnamon
2 teaspoon ground ginger
1 teaspoon fresh grated nutmeg
1/4 teaspoon ground cloves 
3 eggs
1 cup (6.25 oz.) Truvia Sweet Complete Granulated All-Purpose Sweetener 
1 cup (5.75 oz.) Truvia Sweet Complete Brown Sweetener 
1/2 cup buttermilk
1 tablespoon vanilla extract
3/4 cup vegetable oil 
1 1/2 cups (5.5 oz.) peeled and shredded granny smith apple, about 2 large

Heat oven to 350 degrees F. Lightly coat a 10-12 cup bundt pan with non-stick spray. Set aside. 

In a large bowl, whisk together the flour, baking powder, baking soda, cinnamon, ginger, nutmeg and cloves. Set aside.

In a second large bowl, add the eggs, and beat until combined. Add both the Truvia Sweet Complete Granulated All-Purpose and Brown Sweeteners, whisk until fully incorporated. Pour in buttermilk, vanilla extract, and vegetable oil, whisk until combined. 

Fold dry ingredients into the wet until smooth. Add the grated apples and fold until just combined. 

Pour batter in prepared pan and bake for 45 minutes or until a cake tester comes out free of wet batter. Transfer cake to a wire rack and let cool in the bundt pan for 20 minutes. Unmold cake and let cool completely on a wire rack. Before serving, dust with Truvia Sweet Complete Confectioners Sweetener. Enjoy outside with a seasonal beverage!
Easy Chicken Tortilla Soup because fall means swea Easy Chicken Tortilla Soup because fall means sweater weather, cozy soups like this. Who else is ready for this?!
-
Recipe in bio link or Google Easy Chicken Tortilla Soup Bakers Royale
-
#cozy #comfortfood #chickenrecipes #soup #easyrecipes #weeknightmeals #instayum
Coconut Oatmeal Chocolate Bars ~ Holiday condition Coconut Oatmeal Chocolate Bars ~ Holiday conditioning with this one. I’m so ready to eat my weight in holiday sweets.
-
Recipe in in profile link or Google Bakers Royale Coconut Oatmeal Chocolate Bars
-
#baking #bakingwithlove #bakedfromscratch #bakersgonnabake #oats #instayum #instabake
Double Decker Ooey Gooey Bars - Come and get it! W Double Decker Ooey Gooey Bars - Come and get it! We all need the extra fat for winter. Who’s in?
-
#baking #bakersgonnabake #sweettreats #madefromscratch #dessert #brownies #ooeygooey

Copyright © 2022 Bakers Royale

Terms of Use · Privacy Policy · Contact