• Facebook
  • Google+
  • Instagram
  • Pinterest
  • Twitter

Bakers Royale

  • Sweet
  • Savory
  • All Recipes
  • About
    • Press
  • Contact

Snickers and Brownie Ice Cream

August 4, 2011 By Naomi Robinson | Bakers Royale 15 Comments

Snickers. Brownie. Ice cream. Get all your sweet cravings in one dessert. The only rule, to eating this dessert: Any drips shall be licked and not wiped away.

Snickers and Brownie Ice Cream

I hate waste.With that in mind, I decided to repurpose the remaining Snickers Cheesecake Brownie in some ice cream. This is what happens when you bake like crazy and family and friends start telling you they will only take small samples for taste testing.

Yes, it’s true. I’m now forbidden, or at least until bikini season ends to bring over full dessert trays. I’ve been told sugar and butter can have an expanding effect on peoples body when consumed in high amounts. I say don’t believe the hype.

As for the Snicker’s Ice Cream-big hit! It’s rich, it’s creamy and you will look good eating it.

A few notes:

  • The base of this ice cream is vanilla. But since the brownies were fudgy they turned the ice cream base to chocolate (no complaints here on that one).
  • This is a highly adaptable recipe, so I’ve provided a basic vanilla ice cream recipe. If you would like to use the Snickers Cheesecake Brownie as your add-in, the recipe is here. Otherwise add-in what suits your palate or what you have on hand. Suggestions: Oreos, chopped up Reeses Peanut Butter, left over mixed berry pie or any pie.
  • You can cut the richness and calories by changing the cream and milk portion from 2-1 to 1-1, as in 1½ cup heavy cream and 1½ cup milk.
  • If you don’t have an ice cream maker, place the finished custard in the freezer for two hours; remove it from the freezer and beat it with a hand mixer or with the paddle attachment of a stand mixer on low. Repeat this two more time. Transfer to a tightly sealed container and freeze until firm.
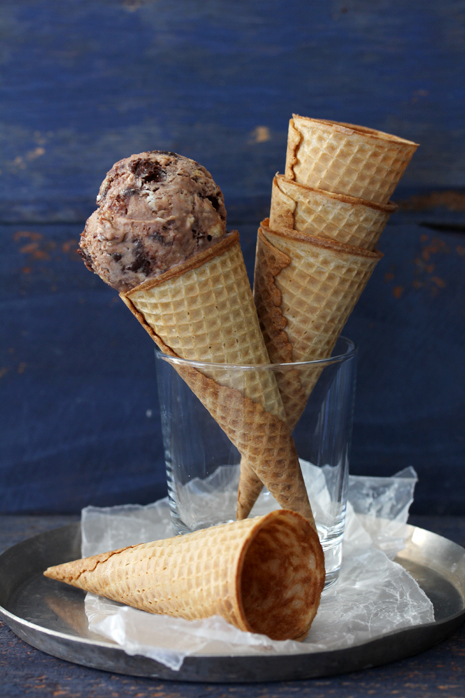
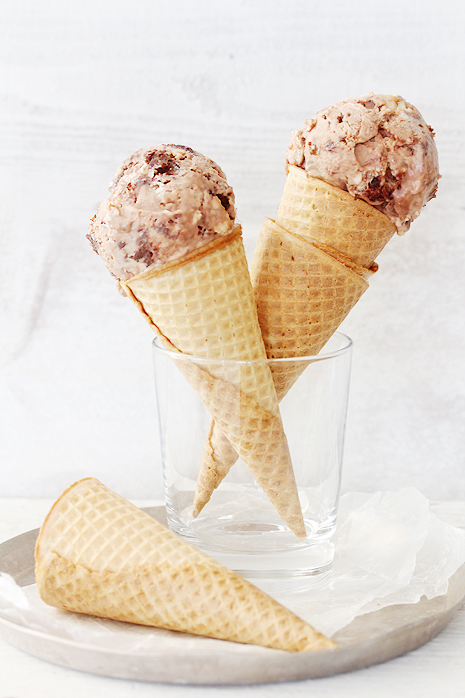
  • As for the two different pictures – more practices in photography. I queried my Facebook readers to see what they thought about the first initial shot (pic here) and I had mixed responses. My favorite one, someone mentioned the ice cream sandwiches looked like they were stuffed with tuna. Ouch! Not good. There were also quite a few responses that the picture was too dark. They were right, I didn’t mind the dark lighting but the ice cream was blown out and looked unappetizing.

I re-did the shot without the ice cream sandwiches, but that had more to do with not having any on hand. The end result was not being able to decide between the white and blue background, so again, I queried everyone. The winner from those who were kind of enough to give me their input was for the white background.

I have to say my choice is for the blue I like the lighting and the composition better. But I also tend to like darker shots, which of course is a bigger challenge for me than bright or bright white shots. I’d love to hear what you think. Let me know in the comments section of this post which picture you like best.

Basic Vanilla Ice Cream

Ingredients:

  • 2 cups cream, divided use
  • 1 cup milk
  • ½ cup granulated sugar
  • Pinch of salt
  • 5 large egg yolks
  • 2 teaspoons vanilla extract
  • 1/2 cup add-in

Instructions:

1. Create an ice bath by filling a large roasting pan or casserole dish with ice water halfway up. Pour 1 cup of cream into a medium size bowl and place the bowl into the ice bath and place a strainer on top of the bowl. Set aside.

2. Add remaining 1 cup of cream, milk, sugar and salt into a saucepan over medium heat. Stir mixture until sugar dissolves and tiny bubbles appear around the edge of the pan, about 3-4 minutes. Set aside to cool slightly.

3. Whisk the egg yolks in a bowl then pour heated (slightly cooled) cream mixture onto the egg yolks and whisk constantly to prevent curdling. Place the combined egg and cream mixture to a saucepan and cook over low heat, stirring constantly until the custard thickens (it should be thick enough to coat the back of a spatula and hold a line drawn through it) and temperature on an instant read thermometer reads 175 degrees F. Remove pan from heat and strain custard into the cold cream in the ice bath. Stir custard mixture to below 70 degrees over ice bath.

4. Transfer custard to refrigerator to chill for at least 4 hours or overnight. Remove from refrigerator and transfer to your ice cream maker and churn according to manufacturer’s instructions.
Filed Under: Ice Cream, Popsicles, Sorbet, Sweet

« Cocktail Popsicle: White Sangria
Peaches and Cream Gin Fizz »

Comments

  1. Jamie says

    August 5, 2011 at 8:21 am

    Wow, this Snickers and Brownie Ice Cream looks really delicious and very refreshing. And yeah with those ice cream, I also don’t believe the hype(closed eye).lols Thanks for sharing the vanilla ice cream recipe.

  2. Caroline says

    August 5, 2011 at 11:39 am

    Yum!!! No chocolate goes to waste in my house. 😉 Perfection.

  3. Brooke (Baking with Basil) says

    August 5, 2011 at 12:52 pm

    Although it is before 9am, I could go for a cone of that right now! I think either shot looks great, but I agree with you. I’m more drawn to the blue. I think the ice cream looks richer.

  4. Janet says

    August 5, 2011 at 9:21 pm

    I like the white better. The blue is too dark for ice cream.

  5. Maris (In Good Taste) says

    August 5, 2011 at 9:41 pm

    Great photos and boy does that ice cream look good!

  6. Rena says

    August 6, 2011 at 2:39 am

    The ice cream and the blue picyure looks ah-mazing

  7. Jenna says

    August 6, 2011 at 11:19 pm

    Definitely doesn’t look like tuna anymore. 😉 I’m with you – I love the blue.

  8. Jessica says

    August 7, 2011 at 3:22 am

    The ice cream sounds delish! And for the picture, I like the white best.

  9. Kate@FudgyGoodness says

    August 7, 2011 at 7:16 am

    Ooh, I suspect I will look real good eating this! What a great ice-cream flavour… will definitely try this, thanks 🙂

  10. thecoffeesnob says

    August 7, 2011 at 10:42 am

    I personally love slightly darker shots of food so I love the first photo with the blue background. But I certainly wouldn’t say no to the ice cream cones in either shots! 🙂

  11. Dee at Deelicious Sweets says

    August 7, 2011 at 3:42 pm

    I can’t decide which shot I like better. I guess you would have to break it down to what kind of mood you were going for. The second shot says to me bright, summery and cheerful which is good for ice cream. Great recipe, I like how you used your leftover baked goods. Waste not want not!

  12. Jennifer (Delicieux) says

    August 8, 2011 at 12:28 am

    My God this looks to die for!!!!!!!! Yum!

    I love the darker shot too, but I always love darker backgrounds on photos. I think the food stands out better.

  13. Shannon at dinnerordessert says

    August 8, 2011 at 6:52 pm

    Oh snickers ice cream is my favorite, love the use of the left over brownies! My vote is for the darker shot with the blue background.

  14. Lorie says

    August 9, 2011 at 3:26 am

    Naomi, it is beautiful! Which I am sure has something to do with your amazing photography and a little to do with the fact that there are snicker brownies in that ice cream!

  15. Su-yin says

    August 10, 2011 at 6:56 pm

    Love the gorgeous photos – I must say I like the dark blue background! 🙂

Leave a Reply Cancel reply

Your email address will not be published. Required fields are marked *

About Naomi Robinson

Welcome to my cozy corner where baking meets random thoughts and musings. I’m a self-taught baker sharing all things sweet (and some savory—okay, and cocktails) with a whisk in one hand and a camera in the other.

More about Naomi »


Recent Posts

Frosted Guinness Cookie Bar

Homemade Churros with Chocolate Guinness Dipping Sauce

Chocolate Cream Guinness Pie with Toasted Meringue

Coffee Crunch Cupcakes via Bakers Royale

Coffee Crunch Cupcakes

Baker's Royale Cookbook

Categories

Bakers Royale on Instagram

Cheetos Flamin’ Hot Crunchy Fried Mac and Cheese Cheetos Flamin’ Hot Crunchy Fried Mac and Cheese Balls ~ Next level game day food!! Am I right?
-
#tailgate #gameday #macandcheese #foodbeast #cheesey
Shrimp and Corn Chowder ~ When things go crazy we Shrimp and Corn Chowder ~ When things go crazy we go simple! Who else feels this? #ad Back to school has been off to a rocky start with mixed up carpool rides to missed days from being sick. Thankfully soups like this come together quickly and easily. All you need are just a handful of fresh ingredients and some pantry staples like @enjoyrealcoco Coconut Milk and @kettleandfire Bone Broth. Both of which are @TetraPakUSA  packaged. This means I can stock my pantry and not worry about rotating the food month-to-month. The aseptic packaging solution helps unopened food have a shelf life of six months or more without the need for refrigeration or preservatives. I’m telling you it’s the little things, like food packaging—something you don’t even think about most days, that ends up being the thing that can have the biggest impact sometimes! #ProtectsWhatsGood
-
#weeknightdinner #comfortfood  #soupseason #soup #dinnerideas
Who’s ready to roll into fall with cozy, autumna Who’s ready to roll into fall with cozy, autumnal picnics? To kickstart the season, the kids and I are headed to the park to enjoy an Apple Spiced Cake and warm sips of Apple Cider sweetened with our favorite pantry staple, @truvia. #ad

Truvia Sweet Complete Sweeteners are zero-calorie and made with plant-based stevia sweetness. Whether you are using the All-Purpose, Brown, or Confectioners Sweetener, they measure cup-for-cup like sugar in your favorite seasonal baked goods! 

Apple Spiced Cake 
Serves 12 

3 cups (14 oz.) self-rising flour
1 ½ teaspoon baking powder
1 teaspoon baking soda
4 teaspoon ground cinnamon
2 teaspoon ground ginger
1 teaspoon fresh grated nutmeg
1/4 teaspoon ground cloves 
3 eggs
1 cup (6.25 oz.) Truvia Sweet Complete Granulated All-Purpose Sweetener 
1 cup (5.75 oz.) Truvia Sweet Complete Brown Sweetener 
1/2 cup buttermilk
1 tablespoon vanilla extract
3/4 cup vegetable oil 
1 1/2 cups (5.5 oz.) peeled and shredded granny smith apple, about 2 large

Heat oven to 350 degrees F. Lightly coat a 10-12 cup bundt pan with non-stick spray. Set aside. 

In a large bowl, whisk together the flour, baking powder, baking soda, cinnamon, ginger, nutmeg and cloves. Set aside.

In a second large bowl, add the eggs, and beat until combined. Add both the Truvia Sweet Complete Granulated All-Purpose and Brown Sweeteners, whisk until fully incorporated. Pour in buttermilk, vanilla extract, and vegetable oil, whisk until combined. 

Fold dry ingredients into the wet until smooth. Add the grated apples and fold until just combined. 

Pour batter in prepared pan and bake for 45 minutes or until a cake tester comes out free of wet batter. Transfer cake to a wire rack and let cool in the bundt pan for 20 minutes. Unmold cake and let cool completely on a wire rack. Before serving, dust with Truvia Sweet Complete Confectioners Sweetener. Enjoy outside with a seasonal beverage!
Easy Chicken Tortilla Soup because fall means swea Easy Chicken Tortilla Soup because fall means sweater weather, cozy soups like this. Who else is ready for this?!
-
Recipe in bio link or Google Easy Chicken Tortilla Soup Bakers Royale
-
#cozy #comfortfood #chickenrecipes #soup #easyrecipes #weeknightmeals #instayum
Coconut Oatmeal Chocolate Bars ~ Holiday condition Coconut Oatmeal Chocolate Bars ~ Holiday conditioning with this one. I’m so ready to eat my weight in holiday sweets.
-
Recipe in in profile link or Google Bakers Royale Coconut Oatmeal Chocolate Bars
-
#baking #bakingwithlove #bakedfromscratch #bakersgonnabake #oats #instayum #instabake
Double Decker Ooey Gooey Bars - Come and get it! W Double Decker Ooey Gooey Bars - Come and get it! We all need the extra fat for winter. Who’s in?
-
#baking #bakersgonnabake #sweettreats #madefromscratch #dessert #brownies #ooeygooey

Copyright © 2023 Bakers Royale

Terms of Use · Privacy Policy · Contact