• Facebook
  • Google+
  • Instagram
  • Pinterest
  • Twitter

Bakers Royale

  • Sweet
  • Savory
  • All Recipes
  • About
    • Press
  • Contact

How To Make a Ruffle Cake

March 31, 2012 By Naomi Robinson | Bakers Royale 25 Comments

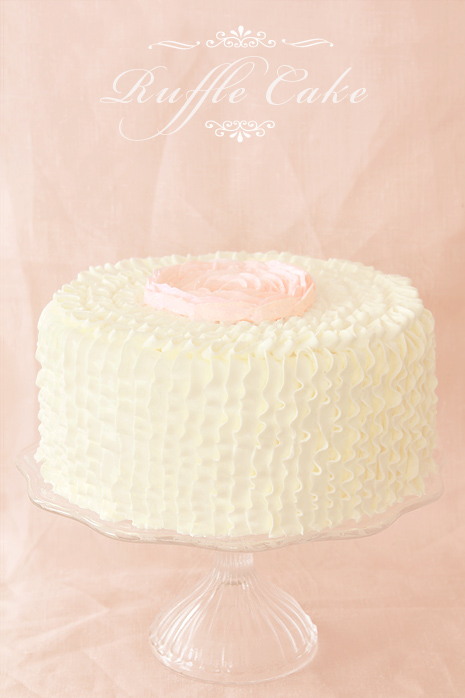
I’m generally not a frilly type person, but when it comes to cakes-I want my frill! In this case I got my fix with a ruffle cake. This is a little bit of a variaion on this hugely popular version. My quest for a ruffle cake started with this one—wow, right? As many of you know I’m working on my cake carving skills, so while I can’t pull a Maggie Austen, I did pull off a vertical ruffle cake.

Ruffle Cake

It’s actually very simple and only requires piping a straight a line and applying the right amount of pressure. And if I can do it, anyone can.

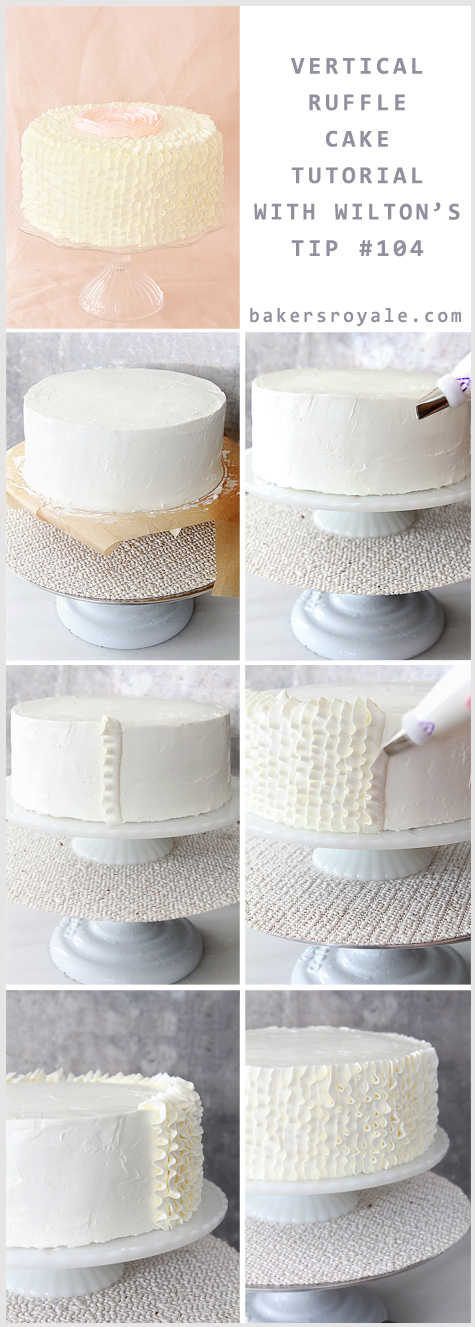
Below is a quick tutorial with step-by-step pictures for how to make a ruffle cake.

A few notes:

  • Make sure you have a gripper of some sort between the cakestand and the turntable. You definitely don’t want the cakestand bobbling around while you spin it.
  • For an awesome tutorial to frosting a cake before you start ruffling, click here and here. The latter is a really useful video a reader left on another post for me. Thanks Heather!
  • Here is a tutorial on the Martha Stewart Ruffle Tower. For another ruffle variation, check out this one.
  • For an alternate finishing top click here-there’s also my favorite chocolate cake recipe in that post as well.

Ruffle Cake Tutorial

Directions:

  1. Fit a pastry bag with Wilton’s #104 tip. Then fill the pastry bag with frosting. I used my Vanilla Swiss Meringue Buttercream. Definitely remove your frosting paper strips before you start ruffling. I know-basic, but I forgot on my first run and ended up with a sloppy bottom edge. If you do happen to forget, refrigerate the cake and let the frosting chill then remove it. That will minimize the messy edges.
  2. Hold the bag with long tip down. Position hand with pastry bag at a 45 degree angle.
  3. Apply firm pressure as you move from bottom to top. ***Important note: If you are new to piping with this tip, practice on the side of a glass before you go for the cake. This way you will know what “firm” pressure is for you.
    If you don’t apply enough pressure the frosting will come out straight instead of ruffled. Make sure to finish each ruffled line over the top edge of the cake. Continue to overlap each ruffled line sighly until side of cake is coverered. Scrape top clean and even of any ruffled edgeds then finish top as desired.
Filed Under: Cakes, Sweet

« Best Chocolate Cake Recipe
Easter cocktail-sort of: Peep Jello Shot »

Comments

  1. Becca says

    April 1, 2012 at 7:36 am

    I love the piping on this cake. GORGEOUS. The step-by-step is so helpful.

  2. Kaitlin says

    April 1, 2012 at 1:12 pm

    Beautiful! I like your version better than the one on MS’s site. It’s cleaner and more feminine-looking. Great work! Thanks, again, for the link 🙂

    Also, I’m SO happy you linked to Maggie Austen’s page. I’ve seen her cakes before on Pinterest, but they’ve never properly linked. I didn’t realize they were all from the same person!

  3. Annie @ Annie's Cooking Lab says

    April 1, 2012 at 2:16 pm

    That’s beautiful! I wish I had more occasions to make cake, I want to try this out!

  4. Kiran @ KiranTarun.com says

    April 1, 2012 at 5:21 pm

    Beautiful and thank you for the tutorial — definitely need to practice on my pipping skills 😉

  5. Rachel @ Baked by Rachel says

    April 1, 2012 at 6:12 pm

    So pretty and I absolutely love the flower on top!

  6. Orchid says

    April 1, 2012 at 8:32 pm

    That cake looks so beautiful! I’ll have to try that technique next time I make a cake!

  7. Ashley says

    April 1, 2012 at 1:52 pm

    This is gorgeous- love the touch of pink on top!

  8. Luciana says

    April 2, 2012 at 3:37 am

    So so pretty! I love it!

  9. Caroline @ chocolate & carrots says

    April 2, 2012 at 10:50 am

    What a beautiful cake!!!

  10. OLGA says

    April 2, 2012 at 12:35 pm

    Wow this is really a great and Precious Cake.
    Can I have a piece please?
    Regards
    Olguis.

  11. Courtney says

    April 2, 2012 at 1:15 pm

    Love it! Have been wanting to try this piping technique for a while now but haven’t had an excuse 😉 I do have a question though…I’m sure it will be pretty clear when I actually attempt this, but just how do you get the top edge nice and clean without disturbing and smashing the top of the ruffles?

  12. Maria says

    April 2, 2012 at 2:14 pm

    So beautiful and thanks for the tips!

  13. Alison @ Ingredients, Inc. says

    April 2, 2012 at 2:39 pm

    fabulous! You are SO talented!!

  14. Krissy's Creations says

    April 2, 2012 at 6:00 pm

    I LOVE this new variation of the ruffle cake! I’ve wanted to try and new version and now I will definitely use this technique 🙂

  15. Ela says

    April 2, 2012 at 8:19 pm

    Wow! I love the new ruffle design. At least it isn’t using a ton of buttercream like the other previous designs. Your cake looks so dainty. Thanks from doing it step-by-step. It helps a lot.

  16. meatballs & milkshakes says

    April 2, 2012 at 9:16 pm

    wow!! that’s so beautiful!

  17. Naomi says

    April 3, 2012 at 3:11 am

    Hi Courtney – To clean the top use a bench scraper and drag the the ruffling to the center of the top and use an icing spatula to smooth out the whole top.

  18. Lauren says

    April 3, 2012 at 8:52 pm

    SO gorgeous! Seems pretty simple to do, but looks so fancy!

  19. Brenda @ a farmgirl's dabbles says

    April 5, 2012 at 1:42 pm

    That is so very gorgeous. I love it!!

  20. Quyen - Kitchen Runway says

    April 6, 2012 at 3:43 am

    It’s gorgeous Naomi! I love it! All I need now is a fork and I’m heading over to help you polish off that cake. Ruffles and all!

  21. Nicole {Sweet Peony} says

    April 9, 2012 at 5:36 pm

    Absolutely gorgeous, Naomi! I really want to challenge myself & try a ruffle cake… soon! 🙂

  22. Ann P. says

    April 30, 2012 at 5:05 am

    This is really stunning! i love the step-by-step pictures–you make it look so easy! To frost a standard 9-inch, 2-layer cake, would you say it takes about one batch of your swiss meringue buttercream, or more?

  23. Meshal says

    April 12, 2013 at 2:44 am

    That looks amazing!! But how did u pipe that rose in the middle i love that!

  24. lolly says

    May 7, 2013 at 11:59 am

    love the ruffeling

  25. lolly says

    May 7, 2013 at 12:02 pm

    lovin the rose in the middle can i have a slice???

Leave a Reply Cancel reply

Your email address will not be published. Required fields are marked *

About Naomi Robinson

Welcome to my cozy corner where baking meets random thoughts and musings. I’m a self-taught baker sharing all things sweet (and some savory—okay, and cocktails) with a whisk in one hand and a camera in the other.

More about Naomi »


Recent Posts

Chocolate Cream Guinness Pie with Toasted Meringue

Coffee Crunch Cupcakes via Bakers Royale

Coffee Crunch Cupcakes

Apple Cake with Guinness Caramel Sauce

Chewy Coffee and Chocolate Chunk Blondies

Baker's Royale Cookbook

Categories

Bakers Royale on Instagram

Cheetos Flamin’ Hot Crunchy Fried Mac and Cheese Cheetos Flamin’ Hot Crunchy Fried Mac and Cheese Balls ~ Next level game day food!! Am I right?
-
#tailgate #gameday #macandcheese #foodbeast #cheesey
Shrimp and Corn Chowder ~ When things go crazy we Shrimp and Corn Chowder ~ When things go crazy we go simple! Who else feels this? #ad Back to school has been off to a rocky start with mixed up carpool rides to missed days from being sick. Thankfully soups like this come together quickly and easily. All you need are just a handful of fresh ingredients and some pantry staples like @enjoyrealcoco Coconut Milk and @kettleandfire Bone Broth. Both of which are @TetraPakUSA  packaged. This means I can stock my pantry and not worry about rotating the food month-to-month. The aseptic packaging solution helps unopened food have a shelf life of six months or more without the need for refrigeration or preservatives. I’m telling you it’s the little things, like food packaging—something you don’t even think about most days, that ends up being the thing that can have the biggest impact sometimes! #ProtectsWhatsGood
-
#weeknightdinner #comfortfood  #soupseason #soup #dinnerideas
Who’s ready to roll into fall with cozy, autumna Who’s ready to roll into fall with cozy, autumnal picnics? To kickstart the season, the kids and I are headed to the park to enjoy an Apple Spiced Cake and warm sips of Apple Cider sweetened with our favorite pantry staple, @truvia. #ad

Truvia Sweet Complete Sweeteners are zero-calorie and made with plant-based stevia sweetness. Whether you are using the All-Purpose, Brown, or Confectioners Sweetener, they measure cup-for-cup like sugar in your favorite seasonal baked goods! 

Apple Spiced Cake 
Serves 12 

3 cups (14 oz.) self-rising flour
1 ½ teaspoon baking powder
1 teaspoon baking soda
4 teaspoon ground cinnamon
2 teaspoon ground ginger
1 teaspoon fresh grated nutmeg
1/4 teaspoon ground cloves 
3 eggs
1 cup (6.25 oz.) Truvia Sweet Complete Granulated All-Purpose Sweetener 
1 cup (5.75 oz.) Truvia Sweet Complete Brown Sweetener 
1/2 cup buttermilk
1 tablespoon vanilla extract
3/4 cup vegetable oil 
1 1/2 cups (5.5 oz.) peeled and shredded granny smith apple, about 2 large

Heat oven to 350 degrees F. Lightly coat a 10-12 cup bundt pan with non-stick spray. Set aside. 

In a large bowl, whisk together the flour, baking powder, baking soda, cinnamon, ginger, nutmeg and cloves. Set aside.

In a second large bowl, add the eggs, and beat until combined. Add both the Truvia Sweet Complete Granulated All-Purpose and Brown Sweeteners, whisk until fully incorporated. Pour in buttermilk, vanilla extract, and vegetable oil, whisk until combined. 

Fold dry ingredients into the wet until smooth. Add the grated apples and fold until just combined. 

Pour batter in prepared pan and bake for 45 minutes or until a cake tester comes out free of wet batter. Transfer cake to a wire rack and let cool in the bundt pan for 20 minutes. Unmold cake and let cool completely on a wire rack. Before serving, dust with Truvia Sweet Complete Confectioners Sweetener. Enjoy outside with a seasonal beverage!
Easy Chicken Tortilla Soup because fall means swea Easy Chicken Tortilla Soup because fall means sweater weather, cozy soups like this. Who else is ready for this?!
-
Recipe in bio link or Google Easy Chicken Tortilla Soup Bakers Royale
-
#cozy #comfortfood #chickenrecipes #soup #easyrecipes #weeknightmeals #instayum
Coconut Oatmeal Chocolate Bars ~ Holiday condition Coconut Oatmeal Chocolate Bars ~ Holiday conditioning with this one. I’m so ready to eat my weight in holiday sweets.
-
Recipe in in profile link or Google Bakers Royale Coconut Oatmeal Chocolate Bars
-
#baking #bakingwithlove #bakedfromscratch #bakersgonnabake #oats #instayum #instabake
Double Decker Ooey Gooey Bars - Come and get it! W Double Decker Ooey Gooey Bars - Come and get it! We all need the extra fat for winter. Who’s in?
-
#baking #bakersgonnabake #sweettreats #madefromscratch #dessert #brownies #ooeygooey

Copyright © 2023 Bakers Royale

Terms of Use · Privacy Policy · Contact