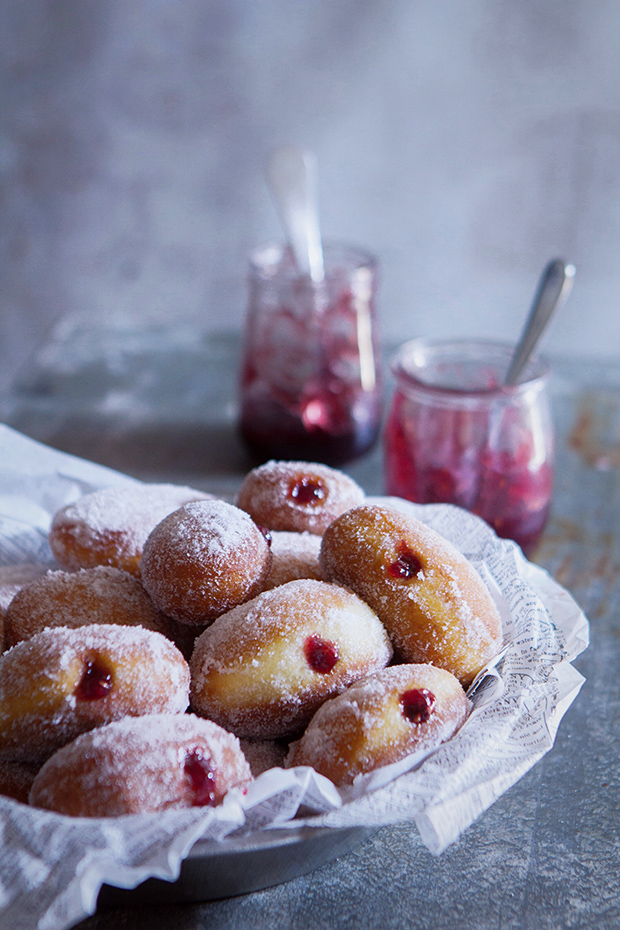
Chewy, pillowy-soft yeast doughnuts: yes please! This jelly doughnut recipe proves you can make perfect, fluffy donuts at home in less than two hours. Let’s do it!
Okay, so I might be stretching it because these doughnuts require yeast while most cakes don’t; and this hardly has any butter, whereas most cakes do. But do we have to be technical? Let’s just agree that it’s a spongy-like cake with a little more elasticity.
Yeah. Okay, let’s do this.
Please.
Because I even went as far as doing step-by-step photos to show you how easy this recipe is to pull off. Admittedly, step-by-step photos take a good long while to do, but I tried a video and that was a colossal failure. I scrapped it half way through. Ah well. Luckily, the pictures worked out, so really, now you must make this. I promise it’s worth the effort. But if I still haven’t convinced you, pass this along to a friend who will make these for you, because homemade doughnuts are the awesome-est (awesomest – a real word if you play Scrabble with me) and even more awesome when they are jelly-filled.

Homemade Jelly Doughnuts
Ingredients
- 2 tablespoons active dry yeast
- 1/2 cup milk (100 degrees to 110 degrees)
- 1/3 cup + 1 teaspoon sugar
- 2 1/4 cups all-purpose flour
- 3 large egg yolks
- 2 tablespoons unsalted butter, room temperature
- 2 teaspoons salt
- 3 cups vegetable oil
- 1 cup seedless raspberry jam
Instructions
Recipe adapted from Martha Stewart
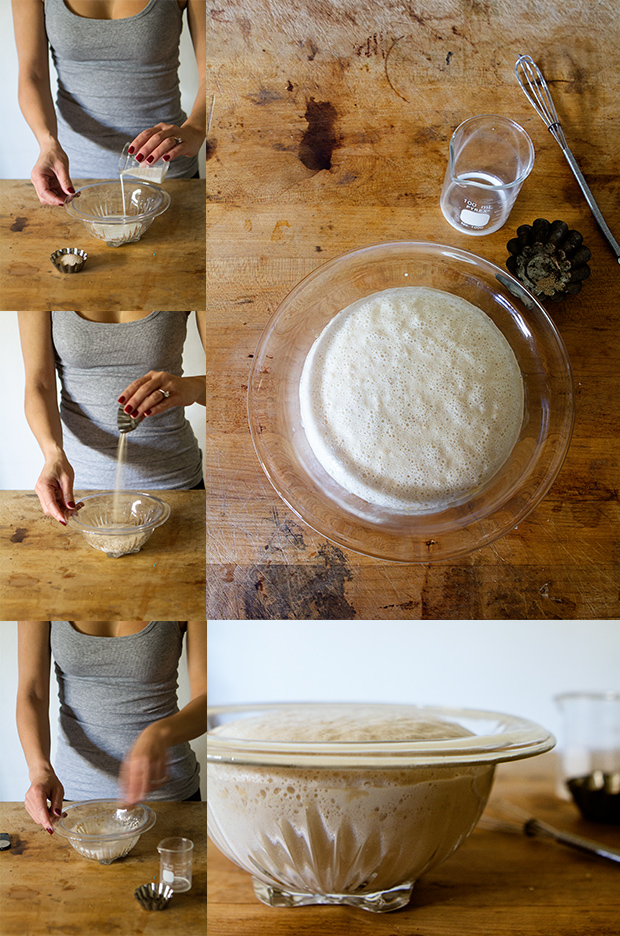
Place yeast, warm milk, and 1 teaspoon sugar in a small bowl. Set aside until foamy and doubled in size, about 15 minutes.
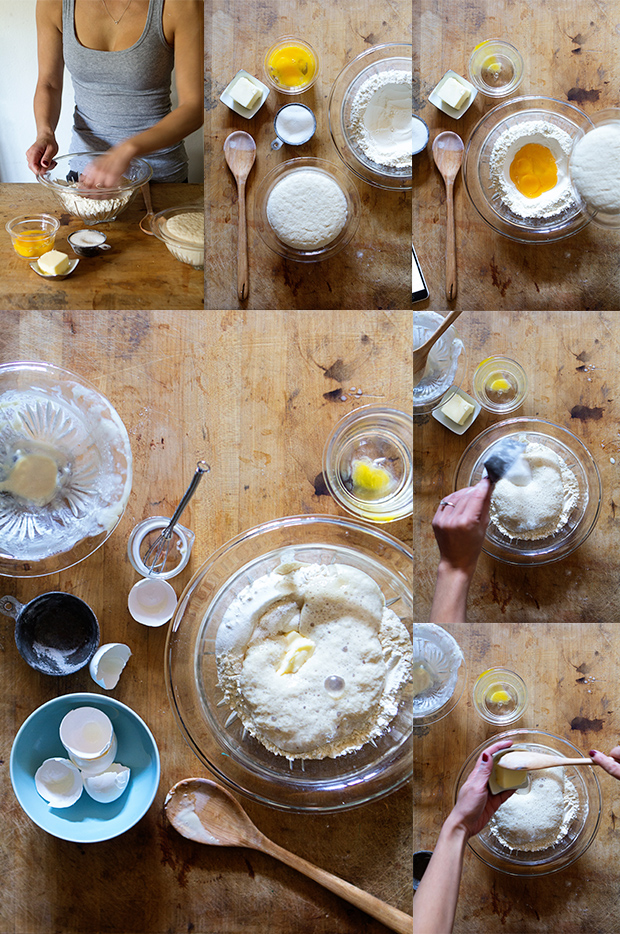
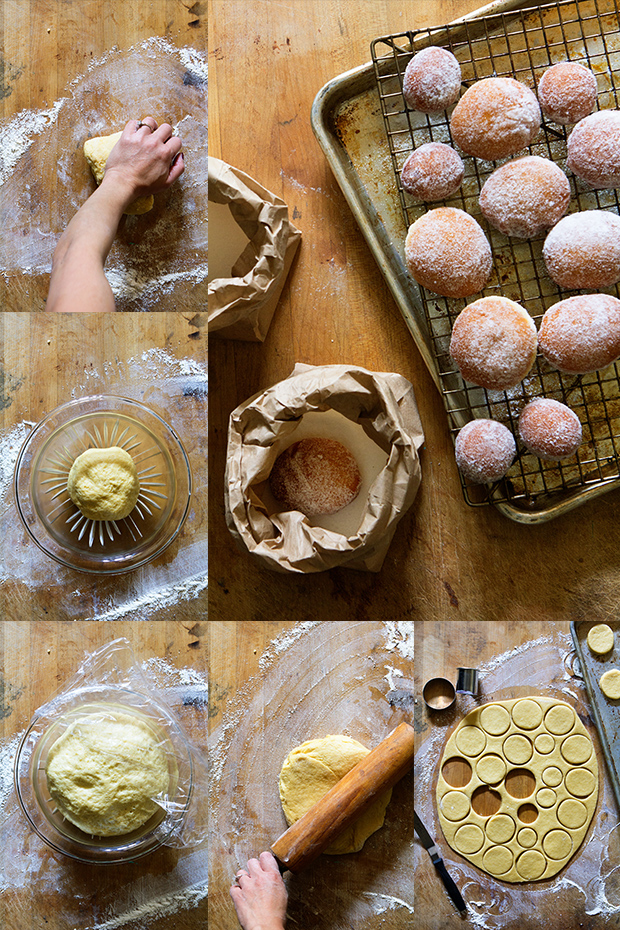
Place flour in a large bowl. Create a well in the center and add eggs, yeast mixture, 1/4 cup sugar, butter, and salt. Using a wooden spoon, stir dough starts to come together and is sticky. Flour a work surface and knead until dough is smooth, soft, and bounces back when poked with a finger, about 8 minutes (add more flour if necessary). Place in a lightly oiled bowl; cover with plastic wrap. Set in a warm place to rise until doubled, 1 to 1 1/2 hours.
Lightly flour a work surface, roll dough to 1/4-inch thickness. Using a 2 1/2-inch-round cutter, cut 20 rounds. Cover with plastic wrap; let rise 15 minutes.
In medium saucepan over medium heat, heat oil until a deep-frying thermometer registers 370 degrees. Using a slotted spoon, carefully slip 2 rounds into oil. Fry until golden, about 40 seconds. Turn doughnuts over; fry until golden on other side, another 40 seconds. Using a slotted spoon, transfer to a paper-towel-lined baking sheet. Roll in sugar while warm. Fry all dough, and roll in sugar.
Fill a pastry bag fitted with a #4 tip with jam. Using a wooden skewer or toothpick, make a hole in the side of each doughnut. Fit the pastry tip into a hole, pipe about 2 teaspoons jam into doughnut. Repeat with remaining doughnuts.
Notes
Adaptations I made to the original recipe:
This recipe is untraditional in the sense that it lets the yeast proof beyond just foaming. I let the yeast double in size because it makes for a jelly doughnut that is just a bit chewier the way I like it. To keep, the doughnuts pillowy-soft stick to the original recipe and proof the yeast just until foamy, about 10 minutes.
The original recipe uses water, I use milk instead. I went for the latter because it seems to hold the heat a bit longer than water, a necessary thing when you proof the yeast to double the size rather than just foamy (this is solely an empirical observation and not scientific in any way).
The original recipe uses 2 1/2 cups of four, but I dropped that to 2 1/4 cup.
The original recipe uses two large eggs, but I went for 3 large egg yolks instead for some added density and chewiness—again, if you like your jelly doughnut pillowy soft and light, stick to the original recipe and just use two eggs.
Lastly, I skipped the nutmeg.
Wow! These look delightful and I LOVE your step by step photos. I’ve always been a bit scared to try doughnut making, but I think now I really have no excuse not to try!
Lauren x
Can’t wait to make these. Thanks for the great photos. What brands of jams would you recommend for more deliciousness?!
These doughnuts are fabulous! love all of the photos!
Awesomest indeed! Great step-by-step & yes….loads of work to do one, but worth it!
These look delightful, soft and puffy and prettily sugared!
So, Boston is all about the Dunkin’ Donuts and I just can’t get behind it… for me, a doughnut should be subtly sweet and light with a bit of chew. Yours look absolutely perfect. Really need to get on the doughnut making bandwagon here.
These doughnuts look absolutely divine. Making doughnuts with grandma was a favorite activity when I was a wee one. As an adult, I’ve never actually made them. Can you believe this? I think we are going to have to change that lickety split.
These process shots are incredible!! Love your wood table and of love these doughnuts!! The look perfect!
These photos are amazing!! Also, totally can’t wait to action these doughnuts!
That first description about what you love about doughnuts is me all day. I love the exact same things. These are sooo perfect. I want to stuff them in my mouth.
These look amazing And delicious. The photos are a great help! Will definitely give these a try.
Linda
there is probably nothing better on this planet than a hot fresh doughnut and these pictures are AMAZING!!!
Homemade donuts are just the best. Your recipe looks PERFECT!
Naomi these doughnuts look wonderful! I absolutely love your step by step photos! I am sure lots of time went into this whole post, doughnuts and photos! Awesome!
These are possibly the most perfect jelly donuts I’ve ever seen. Those sugar crystals and that jelly just casually bursting out of the donuts? Swooooon!
These look perfect!! So light and fluffy. Like pillows 🙂 I need a plate of these in my life!
Love these photos, Naomi! And love these donuts even more! They are so dreamy!
Can´t think of anything lovelier than jelly doughnuts! 🙂 Thanks for bringing them to us, Naomi!
GORGEOUS!!! Love these, pinned!
These are so pretty, love the jelly filling!
I am in heart with these photos!! And I agree – the best part of doughtnuts if that they’re dessert for breakfast!!
These look amazing and keeping the sugar in a paper bag for coating the doughnuts just makes so much sense, I can’t believe I never thought of it.
Normally when I use a bowl, it’s never deep enough.
Absolutely stunning doughnuts that look just like the ones I used to eat when I was a child, so thank you for giving me a trip down memory lane! 🙂
Omg! I wish I had a batch of these for breakfast. Doughnuts are on my bucket list!
They look amazing!!!!
I’m in love with these doughnuts! Oh yummmm.
Mmmm these look almost too gourmet and so perfect, Naomi! Love the pictures and the fact that they’re as fresh as they can get. This is coming from a formerly doughnut hating momma who seems to have acquired new taste buds after baby, haha. And ohhh can’t imagine how frustrating it must have been to have have to nix the video
YUM! These are beautiful. In general, I’m not a filled doughnut kinda person, but the thought of customizing them at home with legit jam never occurred to me. Thank you for sharing!
let’s just say I was that weird kid who liked jelly munchkins, so this post is SERIOUSLY hitting home with me!!! cannot get over the mouthwatering results and beautiful pictures, just gorg! x
Just wanted to say you have an obvious typo with the yeast quantity. I found out the hard way after I went through all the steps and ended up with fried yeast balls. I usually cross check with other recipes when in doubt but I was craving donuts so much I just went with your recipe without questioning… I’m going to have to give donuts another try… Your donuts do look tasty.
how long does it take to cook?
Oh no is the yeast quantity wrong….has anyone commenting actually even made these….
Oh no! I should have read all the comments before starting. I thought that sounded like a lot of yeast . We’ll see how this goes when I go to fry them.