• Facebook
  • Google+
  • Instagram
  • Pinterest
  • Twitter

Bakers Royale

  • Sweet
  • Savory
  • All Recipes
  • About
    • Press
  • Contact

Rice Krispie Cakes

February 12, 2012 By Naomi Robinson | Bakers Royale 24 Comments

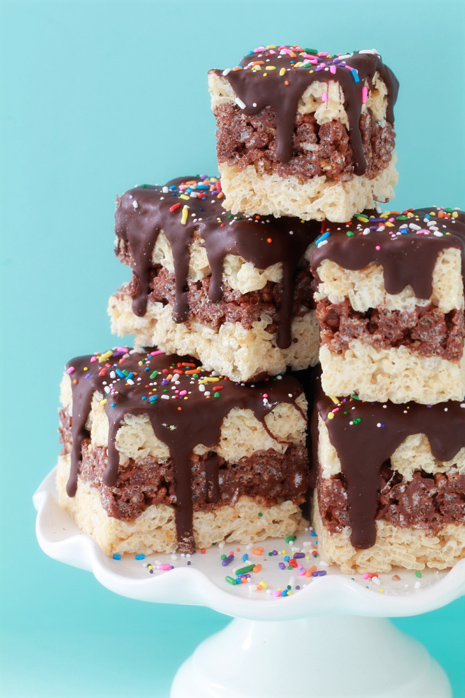
A while back a friend of mine asked if I would help create a kicked up bake sale item for her daughter’s football cheer team. Keeping my audience in mind, I decided to stick with the classic Rice Krispie square but dress it up with a cake like flare.

Rice Krispie Cakes

Yes, I’m a little late posting this since football ended two months ago, but I finally found the photos. If it isn’t already obvious, I’m not so great about having an organized system for storing my photos.

I’m keeping this post super short, because I have preschool homework to do with my little guy. We are crafting 30 handmade Valentine’s card. The weird thing is we aren’t allowed to attach any candy, trinkets or any sort of treats with it. What happened to being able to pass out candy with the cards?

I guess the upside is all that stuff I loaded up on in anticipation of making treat bags will now have to be consumed by me.

A few notes:

  • Rice Krispie cake can be fully assembled two days in advance and kept refrigerated.
  • I used dark chocolate for the recipe, but feel free to change it out for semi or milk chocolate to suit your taste.

Rice Krispie Cake Squares

Preparation: Lightly cover 11×13 pan with bake spray Ingredients:

Vanilla Rice Krispie Layer

  • 5 cups mini marshmallows
  • 4 tablespoons butter
  • 1/4 cup dry white cake mix
  • 1 tablespoon pure vanilla extract
  • 6 cups of Rice Krispies

Chocoloate Rice Krispie Layer

  • 2 1/2 cups mini marshmallows
  • 2 tablespoons butter
  • 1/2 cup semi-sweet chocolate chips
  • 3 cups of Cocoa Rice Krispies

Topping

  • 2 cups semi-sweet chocolate chips
  • 2 tablespoon butter
  • 2 tablespoon jimmies
  • 2 tablespoons nonpareils

Instructions:

  1. To make vanilla layer: Place marshmallows, butter, dry cake mix and vanilla extract in a non-stick pan and melt over low heat. Stir to combine. Quickly add Rice Krispies and stir to combine. Set aside.
  2. To make chocolate layer: Place marshmallows, butter and chocolate chips in a non-stick pan and melt over low heat. Stir to combine. Quickly add Cocoa Rice Krispies and stir to combine.
  3. Press half of vanilla mixture onto the bottom of a11x13 pan. Press chocolate mixture on top and then press remaining vanilla mixture on top of chocolate layer. Set aside for 20 minutes until rice krispie cake is cooled and set. Lightly cover a knife with bake spray and cut to desired size.
  4. Place chocolate and butter in a sauce pan over low heat and stir until melted and combined. Pour chocolate over squares and then sprinkle with jimmies and nonpareils.
Filed Under: Cakes, Sweet

« The Cost of Food Blogging: Part II
Rocky Road Cheesecake »

Comments

  1. Katrina @ Warm Vanilla Sugar says

    February 13, 2012 at 11:06 am

    Whoa. This cake makes me one happy lady!!

  2. Blog is the New Black says

    February 13, 2012 at 1:18 pm

    YUM!

  3. Sara says

    February 13, 2012 at 2:10 pm

    What a fun way to present rice krispies.

  4. Mary @ Bake Break says

    February 13, 2012 at 2:58 pm

    Layered rice krispies… what a novel idea! I love it! I’m sure everyone loved these!

  5. Annie @ Annie's Cooking Lab says

    February 13, 2012 at 3:22 pm

    Oh, I love rice krispie treats! The chocolate layer in the middle sounds delicious, and they look so cute!

  6. Kelly says

    February 13, 2012 at 3:58 pm

    Wow, these look great! You always come up with the best ideas. These will go on my to-do list.

  7. Sommer@ASpicyPerspective says

    February 13, 2012 at 4:21 pm

    Oh momma! I’m thinking your friend is pretty smart. 😉

    They look fantastic!

  8. Averie @ Love Veggies and Yoga says

    February 13, 2012 at 8:34 am

    Oh how I love RKTreats. They are one of my fave desserts and I never tire of them and their endless combos and ways to tweak them. Love your layers!

  9. Becca says

    February 13, 2012 at 5:07 pm

    I’m loving your creative update on this classic.

  10. Lori @ RecipeGirl says

    February 13, 2012 at 5:29 pm

    So super cute. I’m doing Rice Krispie treats for my son’s Valentine party at school tomorrow… but just ho-hum treats dipped in a little chocolate w/ festive sprinkles. Love all of your stuff!

  11. Brooke (Baking with Basil) says

    February 13, 2012 at 7:18 pm

    Rice Krispie treats have a special place in my heart! They are so easy but soo good! Love the festive cake squares.

  12. Brian @ A Thought For Food says

    February 13, 2012 at 5:24 pm

    I REPEAT: What the hell am I supposed to do with you? You keep making crack-a-licious treats that I can’t resist!

  13. Maria says

    February 14, 2012 at 1:45 am

    What a fun treat!

  14. Krissy's Creations says

    February 14, 2012 at 2:31 am

    Great idea! What a wonderful treat 🙂

  15. Shaina says

    February 14, 2012 at 8:29 pm

    These look so cute, and I love that you completely rethought what Rice Krispie bars are.

  16. Russell van Kraayenburg says

    February 15, 2012 at 1:50 am

    These rice krispie cakes are adorable! I think you nailed it with the market on these guys. Does that mean I can’t make some for myself though?

  17. Katie says

    February 14, 2012 at 7:13 pm

    WOW–these look to die for! I can’t wait to give your recipe a try and I look forward to meeting you next month at Food Blog Forum!

  18. Sylvie @ Gourmande in the Kitchen says

    February 15, 2012 at 7:49 am

    I’ve never seen rice krispy treats so dressed up! Love the idea.

  19. Rachel @ Baked by Rachel says

    February 15, 2012 at 4:19 pm

    I love the dripping chocolate – my absolute favorite part, except for the rice krispies 😉

  20. Roxana GreenGirl { A little bit of everything} says

    February 16, 2012 at 1:04 am

    this is such a fun treat!
    I have a similar problem. If I don’t post a recipe in less than 2-3 weeks since I made it, somehow the photos get lost in my not-at-all organized computer :))

  21. Diane {Created by Diane} says

    February 16, 2012 at 4:25 am

    these are beautiful oh how I wish I had one (or twenty) right now 🙂

  22. Lauren @ Around the World Food says

    February 17, 2012 at 12:15 am

    Yummy! I wish I could have had these for my birthday!

  23. Robyn | Add a Pinch says

    February 17, 2012 at 10:02 pm

    I bet these were a HIT!

  24. Ronak Meheta says

    July 19, 2022 at 3:05 am

    Your original revision of this timeless piece is fantastic.

Leave a Reply Cancel reply

Your email address will not be published. Required fields are marked *

About Naomi Robinson

Welcome to my cozy corner where baking meets random thoughts and musings. I’m a self-taught baker sharing all things sweet (and some savory—okay, and cocktails) with a whisk in one hand and a camera in the other.

More about Naomi »


Recent Posts

Chocolate Cream Guinness Pie with Toasted Meringue

Coffee Crunch Cupcakes via Bakers Royale

Coffee Crunch Cupcakes

Apple Cake with Guinness Caramel Sauce

Chewy Coffee and Chocolate Chunk Blondies

Baker's Royale Cookbook

Categories

Bakers Royale on Instagram

Cheetos Flamin’ Hot Crunchy Fried Mac and Cheese Cheetos Flamin’ Hot Crunchy Fried Mac and Cheese Balls ~ Next level game day food!! Am I right?
-
#tailgate #gameday #macandcheese #foodbeast #cheesey
Shrimp and Corn Chowder ~ When things go crazy we Shrimp and Corn Chowder ~ When things go crazy we go simple! Who else feels this? #ad Back to school has been off to a rocky start with mixed up carpool rides to missed days from being sick. Thankfully soups like this come together quickly and easily. All you need are just a handful of fresh ingredients and some pantry staples like @enjoyrealcoco Coconut Milk and @kettleandfire Bone Broth. Both of which are @TetraPakUSA  packaged. This means I can stock my pantry and not worry about rotating the food month-to-month. The aseptic packaging solution helps unopened food have a shelf life of six months or more without the need for refrigeration or preservatives. I’m telling you it’s the little things, like food packaging—something you don’t even think about most days, that ends up being the thing that can have the biggest impact sometimes! #ProtectsWhatsGood
-
#weeknightdinner #comfortfood  #soupseason #soup #dinnerideas
Who’s ready to roll into fall with cozy, autumna Who’s ready to roll into fall with cozy, autumnal picnics? To kickstart the season, the kids and I are headed to the park to enjoy an Apple Spiced Cake and warm sips of Apple Cider sweetened with our favorite pantry staple, @truvia. #ad

Truvia Sweet Complete Sweeteners are zero-calorie and made with plant-based stevia sweetness. Whether you are using the All-Purpose, Brown, or Confectioners Sweetener, they measure cup-for-cup like sugar in your favorite seasonal baked goods! 

Apple Spiced Cake 
Serves 12 

3 cups (14 oz.) self-rising flour
1 ½ teaspoon baking powder
1 teaspoon baking soda
4 teaspoon ground cinnamon
2 teaspoon ground ginger
1 teaspoon fresh grated nutmeg
1/4 teaspoon ground cloves 
3 eggs
1 cup (6.25 oz.) Truvia Sweet Complete Granulated All-Purpose Sweetener 
1 cup (5.75 oz.) Truvia Sweet Complete Brown Sweetener 
1/2 cup buttermilk
1 tablespoon vanilla extract
3/4 cup vegetable oil 
1 1/2 cups (5.5 oz.) peeled and shredded granny smith apple, about 2 large

Heat oven to 350 degrees F. Lightly coat a 10-12 cup bundt pan with non-stick spray. Set aside. 

In a large bowl, whisk together the flour, baking powder, baking soda, cinnamon, ginger, nutmeg and cloves. Set aside.

In a second large bowl, add the eggs, and beat until combined. Add both the Truvia Sweet Complete Granulated All-Purpose and Brown Sweeteners, whisk until fully incorporated. Pour in buttermilk, vanilla extract, and vegetable oil, whisk until combined. 

Fold dry ingredients into the wet until smooth. Add the grated apples and fold until just combined. 

Pour batter in prepared pan and bake for 45 minutes or until a cake tester comes out free of wet batter. Transfer cake to a wire rack and let cool in the bundt pan for 20 minutes. Unmold cake and let cool completely on a wire rack. Before serving, dust with Truvia Sweet Complete Confectioners Sweetener. Enjoy outside with a seasonal beverage!
Easy Chicken Tortilla Soup because fall means swea Easy Chicken Tortilla Soup because fall means sweater weather, cozy soups like this. Who else is ready for this?!
-
Recipe in bio link or Google Easy Chicken Tortilla Soup Bakers Royale
-
#cozy #comfortfood #chickenrecipes #soup #easyrecipes #weeknightmeals #instayum
Coconut Oatmeal Chocolate Bars ~ Holiday condition Coconut Oatmeal Chocolate Bars ~ Holiday conditioning with this one. I’m so ready to eat my weight in holiday sweets.
-
Recipe in in profile link or Google Bakers Royale Coconut Oatmeal Chocolate Bars
-
#baking #bakingwithlove #bakedfromscratch #bakersgonnabake #oats #instayum #instabake
Double Decker Ooey Gooey Bars - Come and get it! W Double Decker Ooey Gooey Bars - Come and get it! We all need the extra fat for winter. Who’s in?
-
#baking #bakersgonnabake #sweettreats #madefromscratch #dessert #brownies #ooeygooey

Copyright © 2023 Bakers Royale

Terms of Use · Privacy Policy · Contact