• Facebook
  • Google+
  • Instagram
  • Pinterest
  • Twitter

Bakers Royale

  • Sweet
  • Savory
  • All Recipes
  • About
    • Press
  • Contact

Baking Basics: How to make homemade pudding

April 10, 2011 By Naomi Robinson | Bakers Royale 27 Comments

Homemade Chocolate Pudding ~ Keeping a favorite childhood dessert simple and easy.

How to Make Homemade Chocolate Pudding

Homemade Chocolate Pudding

Homemade chocolate pudding is filed in my recipe box under the category Sunday desserts. Simple, easy, uncomplicated—everything I want my Sunday to be before I start the work week and that includes my dessert.

Simple in technique, rich in flavor and smooth in texture you will be licking your spoon clean. Pudding is the basis for a few desserts you will see featured this week, so I figured I might as well make it a Baking Basics feature. Especially since homemade pudding is so easily adaptable you can make it into just about any flavor you want once you have the base recipe mastered.

For now, this is a short and sweet post that is fitting for an uncomplicated dessert. And for those wondering, yes, this is ten times better than the box stuff and not that much longer or harder to make. Homemade pudding takes about 15 minutes make.

A few notes:

  • Pudding is highly adaptable, so change out the chocolate portion to your flavor preference, i.e. peanut butter, Nutella, salted caramel, butterscotch, any fruit flavors by adding fruit puree, etc. Keep in mind you may have to adjust to the amount slightly for flavor and consistency.
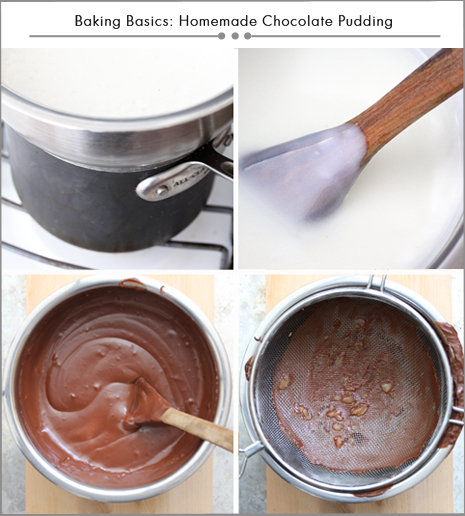
  • Don’t skimp the sieve portion. No matter how much you whisk a few cornstarch pellets will form and leave a lumpy texture if left unstrained.
  • To store place plastic wrap directly on the surface to prevent a skin from forming-that is unless you like it, in which case just cover at the container’s edge and refrigerate.

Homemade Chocolate Pudding

Makes approximately 5-6 cups

Ingredients:

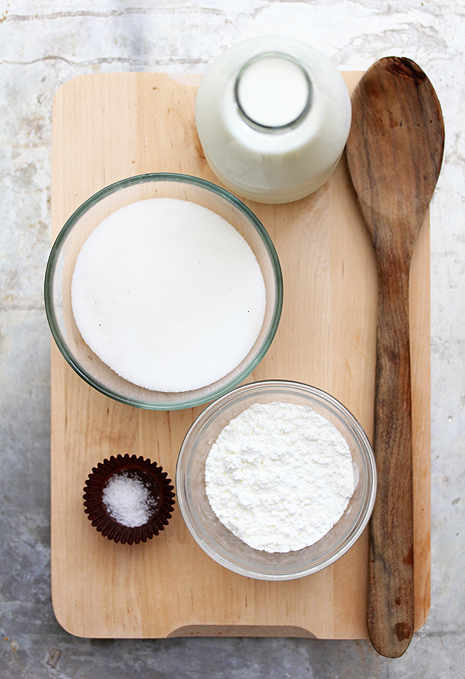
  • 1/3 cup cornstarch
  • ½ cup granulated sugar
  • Pinch of salt
  • 3 cups cold whole milk
  • 3/4 cups dark chocolate, chopped
  • 1 tablespoon vanilla extract

Instructions:

1. Combine cirnstarch, sugar, salt and milk in a blender or food processor and pulse until well blended. Alternatively, combine all ingredients in a bowl and whisk vigorously. Transfer mixture to a heat proof bowl and place over (not on) simmering water for approximately 15-20 minutes, stirring occasionally. Pudding is ready when mixture coats the back of the spoon.  Add chocolate or preferred flavor and stir to combine. Add vanilla and stir to combine.

Filed Under: Baking Basics Series, Fast and Easy, Sweet

« DIY: How to make wood boards for food photograhy
Oreo and Chocolate French Silk Cake »

Comments

  1. Aimee @ Simple Bites says

    April 11, 2011 at 5:18 pm

    Love these baking basics. And you’ve dressed the pudding cups up so cutely!
    Hmm, this was going to be a sugar-free week, but now you’ve go my wheels turning!

  2. Amanda says

    April 11, 2011 at 5:36 pm

    Am I a broken record when I come here?? Just gorgeous girl!!! Love this!

  3. Shaina says

    April 11, 2011 at 6:12 pm

    Love the cute little cups!

  4. Wenderly says

    April 11, 2011 at 6:33 pm

    So darling. You must get tired of reading my same comment. However everything you make is darling and always brings a smile to my lips! Thank you love!

  5. Tracy says

    April 11, 2011 at 7:31 pm

    I LOVE homemade chocolate pudding. Warm or cold. Gorgeous photos!

  6. Brenda @ a farmgirl's dabbles says

    April 11, 2011 at 8:21 pm

    Those are the sweetest looking little bowls of pudding EVER! I’ve never made homemade pudding myself, but you definitely have me thinking about it now. My girls would adore me for it!

  7. Chef Evelyn says

    April 11, 2011 at 11:32 pm

    OMG! I just love chocolate pudding! But I only like the homemade kind. It kind of reminds me of chocolate pastry cream (which I only like warm). Your presentation is beautiful!

    This is something easy that everyone could make. Even with their kids to pack into their lunches. Thanks for sharing.

  8. Maris (In Good Taste) says

    April 11, 2011 at 11:42 pm

    What adorable bowls of chocolate pudding!

  9. Sylvie @ Gourmande in the Kitchen says

    April 12, 2011 at 1:25 am

    I really like that top down shot of the ingredients Naomi, it’s beautiful, as are the pudding cups.

  10. Maria says

    April 12, 2011 at 1:26 am

    I’ve never made pudding. I need to get on it!

  11. Cookbook Queen says

    April 12, 2011 at 2:57 am

    This is seriously the best looking pudding I’ve ever seen!! So cute and fun. And I agree-definitely a recipe everyone should have in their recipe box!!

  12. Tickled Red says

    April 12, 2011 at 5:36 am

    Yeah for homemade pudding! This would be perfect right now…but for now I’ll just have pine away for a bowl.

  13. Kristen says

    April 12, 2011 at 1:55 pm

    Homemade pudding makes me think of my mom… I used to sit by the stove waiting for the pudding to be done. Sooooo good!

  14. Lian says

    April 12, 2011 at 7:19 pm

    these look so festive!! wow, great for a fantastic celebratory dinner. (also I don’t have any kids yet, so I would make them for myself).

  15. Linn says

    April 12, 2011 at 10:24 pm

    Yummy!!!

  16. Brooke (Baking with Basil) says

    April 13, 2011 at 3:38 pm

    I don’t think I’ve ever had homemade pudding before. I can’t wait to try this out!!

    I’m not sure if someone already asked this, if this is a repeat question I’m sorry, but can you substitute skim milk for the whole milk?

  17. Jen @ My Kitchen Addiction says

    April 13, 2011 at 7:06 pm

    Great tip… I love this kind of “back to basics” post. Strangely enough, pudding isn’t something I make often, and I was never really sure how to make homemade pudding (instead of the instant junk). Bookmarking this post!

  18. Jenn@eatcakefordinner says

    April 17, 2011 at 4:22 am

    Great pictures. I love the colorful sprinkles on top!

  19. Justin Long says

    March 19, 2013 at 9:18 pm

    I’m just curious which stage you sieve the mixture at, before or after cooking? Thanks

  20. Justin Long says

    March 19, 2013 at 10:11 pm

    Never mind I just answered my own question

  21. Erin says

    March 25, 2013 at 8:53 pm

    I see that Justin asked about the sieving, and I too am perplexed. I see the photo of the sieve, but no mention in the instructions…

  22. Erin says

    March 25, 2013 at 8:53 pm

    Justin… when to sieve?

  23. dessertfortwo says

    April 4, 2013 at 4:17 am

    Love these simple, quick & delicious desserts!

  24. lilcupcakemaker says

    June 22, 2013 at 5:51 pm

    love pudding! chocolate most.

  25. lilcupcakemaker says

    June 22, 2013 at 5:51 pm

    delicious

  26. lovelylior says

    August 12, 2013 at 5:15 am

    i am trying the pudding but i think i did something wrong because it is not getting harder

  27. Little Cooking Tips says

    November 22, 2015 at 8:30 am

    Excellent work Naomi! Tweeted ASAP!:) Thank you for the wonderful post,have a great Sunday!
    Panos and Mirella

Leave a Reply Cancel reply

Your email address will not be published. Required fields are marked *

About Naomi Robinson

Welcome to my cozy corner where baking meets random thoughts and musings. I’m a self-taught baker sharing all things sweet (and some savory—okay, and cocktails) with a whisk in one hand and a camera in the other.

More about Naomi »


Recent Posts

Chocolate Cream Guinness Pie with Toasted Meringue

Coffee Crunch Cupcakes via Bakers Royale

Coffee Crunch Cupcakes

Apple Cake with Guinness Caramel Sauce

Chewy Coffee and Chocolate Chunk Blondies

Baker's Royale Cookbook

Categories

Bakers Royale on Instagram

Cheetos Flamin’ Hot Crunchy Fried Mac and Cheese Cheetos Flamin’ Hot Crunchy Fried Mac and Cheese Balls ~ Next level game day food!! Am I right?
-
#tailgate #gameday #macandcheese #foodbeast #cheesey
Shrimp and Corn Chowder ~ When things go crazy we Shrimp and Corn Chowder ~ When things go crazy we go simple! Who else feels this? #ad Back to school has been off to a rocky start with mixed up carpool rides to missed days from being sick. Thankfully soups like this come together quickly and easily. All you need are just a handful of fresh ingredients and some pantry staples like @enjoyrealcoco Coconut Milk and @kettleandfire Bone Broth. Both of which are @TetraPakUSA  packaged. This means I can stock my pantry and not worry about rotating the food month-to-month. The aseptic packaging solution helps unopened food have a shelf life of six months or more without the need for refrigeration or preservatives. I’m telling you it’s the little things, like food packaging—something you don’t even think about most days, that ends up being the thing that can have the biggest impact sometimes! #ProtectsWhatsGood
-
#weeknightdinner #comfortfood  #soupseason #soup #dinnerideas
Who’s ready to roll into fall with cozy, autumna Who’s ready to roll into fall with cozy, autumnal picnics? To kickstart the season, the kids and I are headed to the park to enjoy an Apple Spiced Cake and warm sips of Apple Cider sweetened with our favorite pantry staple, @truvia. #ad

Truvia Sweet Complete Sweeteners are zero-calorie and made with plant-based stevia sweetness. Whether you are using the All-Purpose, Brown, or Confectioners Sweetener, they measure cup-for-cup like sugar in your favorite seasonal baked goods! 

Apple Spiced Cake 
Serves 12 

3 cups (14 oz.) self-rising flour
1 ½ teaspoon baking powder
1 teaspoon baking soda
4 teaspoon ground cinnamon
2 teaspoon ground ginger
1 teaspoon fresh grated nutmeg
1/4 teaspoon ground cloves 
3 eggs
1 cup (6.25 oz.) Truvia Sweet Complete Granulated All-Purpose Sweetener 
1 cup (5.75 oz.) Truvia Sweet Complete Brown Sweetener 
1/2 cup buttermilk
1 tablespoon vanilla extract
3/4 cup vegetable oil 
1 1/2 cups (5.5 oz.) peeled and shredded granny smith apple, about 2 large

Heat oven to 350 degrees F. Lightly coat a 10-12 cup bundt pan with non-stick spray. Set aside. 

In a large bowl, whisk together the flour, baking powder, baking soda, cinnamon, ginger, nutmeg and cloves. Set aside.

In a second large bowl, add the eggs, and beat until combined. Add both the Truvia Sweet Complete Granulated All-Purpose and Brown Sweeteners, whisk until fully incorporated. Pour in buttermilk, vanilla extract, and vegetable oil, whisk until combined. 

Fold dry ingredients into the wet until smooth. Add the grated apples and fold until just combined. 

Pour batter in prepared pan and bake for 45 minutes or until a cake tester comes out free of wet batter. Transfer cake to a wire rack and let cool in the bundt pan for 20 minutes. Unmold cake and let cool completely on a wire rack. Before serving, dust with Truvia Sweet Complete Confectioners Sweetener. Enjoy outside with a seasonal beverage!
Easy Chicken Tortilla Soup because fall means swea Easy Chicken Tortilla Soup because fall means sweater weather, cozy soups like this. Who else is ready for this?!
-
Recipe in bio link or Google Easy Chicken Tortilla Soup Bakers Royale
-
#cozy #comfortfood #chickenrecipes #soup #easyrecipes #weeknightmeals #instayum
Coconut Oatmeal Chocolate Bars ~ Holiday condition Coconut Oatmeal Chocolate Bars ~ Holiday conditioning with this one. I’m so ready to eat my weight in holiday sweets.
-
Recipe in in profile link or Google Bakers Royale Coconut Oatmeal Chocolate Bars
-
#baking #bakingwithlove #bakedfromscratch #bakersgonnabake #oats #instayum #instabake
Double Decker Ooey Gooey Bars - Come and get it! W Double Decker Ooey Gooey Bars - Come and get it! We all need the extra fat for winter. Who’s in?
-
#baking #bakersgonnabake #sweettreats #madefromscratch #dessert #brownies #ooeygooey

Copyright © 2023 Bakers Royale

Terms of Use · Privacy Policy · Contact